By: CS2103T-F12-03 Since: Oct 2019 Licence: MIT
- 1. Setting up
- 2. Design
- 3. Implementation
- 4. Documentation
- 5. Testing
- 6. Dev Ops
- Appendix A: Product Scope
- Appendix B: User Stories
- Appendix C: Use Cases
- Appendix D: Non Functional Requirements
- Appendix E: Glossary
- Appendix F: Instructions for Manual Testing
- F.1. Autocomplete
- F.2. Prompting
- F.3. Creating a note
- F.4. Deleting a note
- F.5. Editing a note
- F.6. Listing and filtering notes
- F.7. Creating a group
- F.8. Adding members to a group
- F.9. Removing members from a group
- F.10. List all available groups
- F.11. Find a specific group
- F.12. Deleting a group
- F.13. Tagging a note
- F.14. Untagging a note
1. Setting up
Refer to the guide here.
2. Design
2.1. Architecture
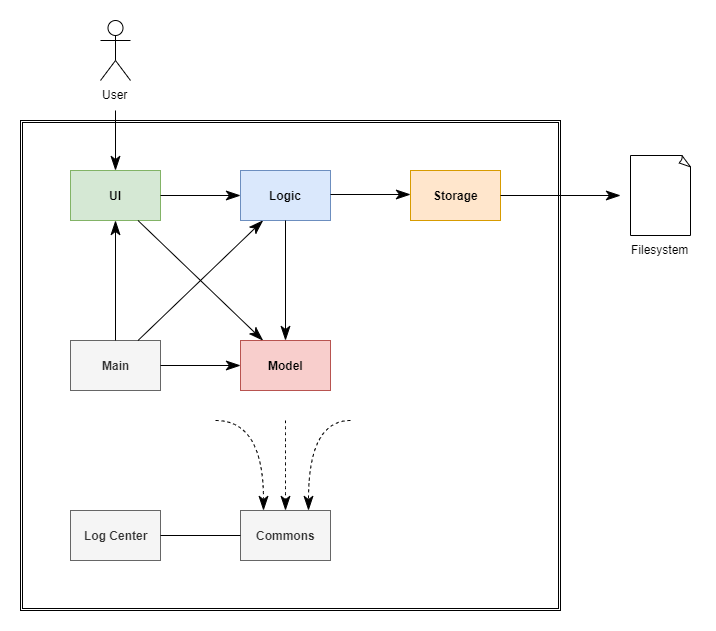
The Architecture Diagram given above explains the high-level design of the App. Given below is a quick overview of each component.
The .puml files used to create diagrams in this document can be found in the diagrams folder.
Refer to the Using PlantUML guide to learn how to create and edit diagrams.
|
-
At app launch: Initializes the components in the correct sequence, and connects them up with each other.
-
At shut down: Shuts down the components and invokes cleanup method where necessary.
Commons represents a collection of classes used by multiple other components.
The following class plays an important role at the architecture level:
-
LogsCenter: Used by many classes to write log messages to the App’s log file.
The rest of the App consists of four components.
Each of the four components
-
Defines its API in an
interfacewith the same name as the Component. -
Exposes its functionality using a
{Component Name}Managerclass.
For example, the Logic component (see the class diagram given below) defines it’s API in the Logic.java interface and exposes its functionality using the LogicManager.java class.
How the architecture components interact with each other
The Sequence Diagram below shows how the components interact with each other for the scenario where the user issues the command delete 1.
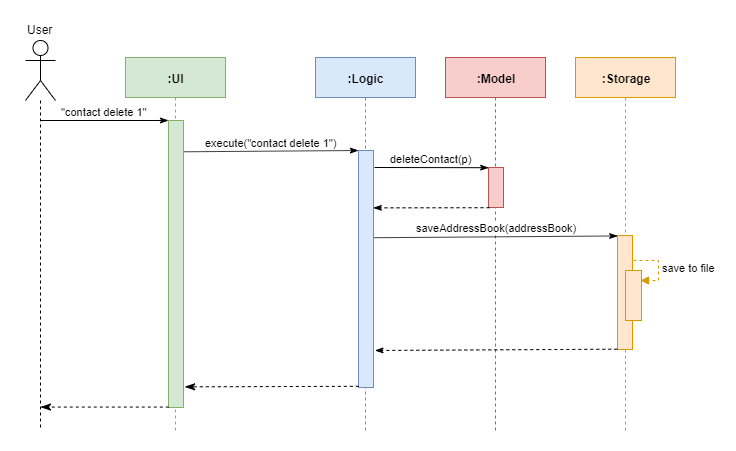
contact delete 1 commandThe sections below give more details of each component.
2.2. UI component
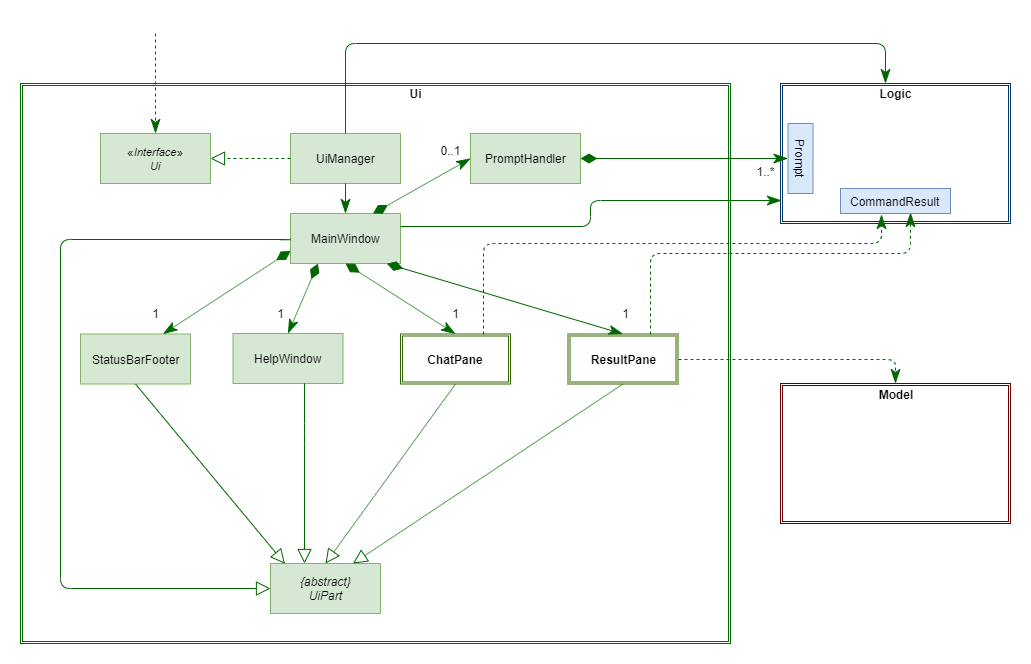
API : Ui.java
The UI consists of a MainWindow which is made up of four parts, i.e. StatusBarFooter, HelpWindow, ChatPane and ResultPane. MainWindow may also have a PromptHandler which contains a list of Prompt objects (see here for more information). In particular,
-
The
ChatPanemanages text interaction with the user. It usesCommandBoxto read commands andDialogBoxto display commands and feedback. To handle auto-completion,CommandBoxuses anAutoCompleteNodeto provide suggestions. The class diagram for the sub-component is shown below.
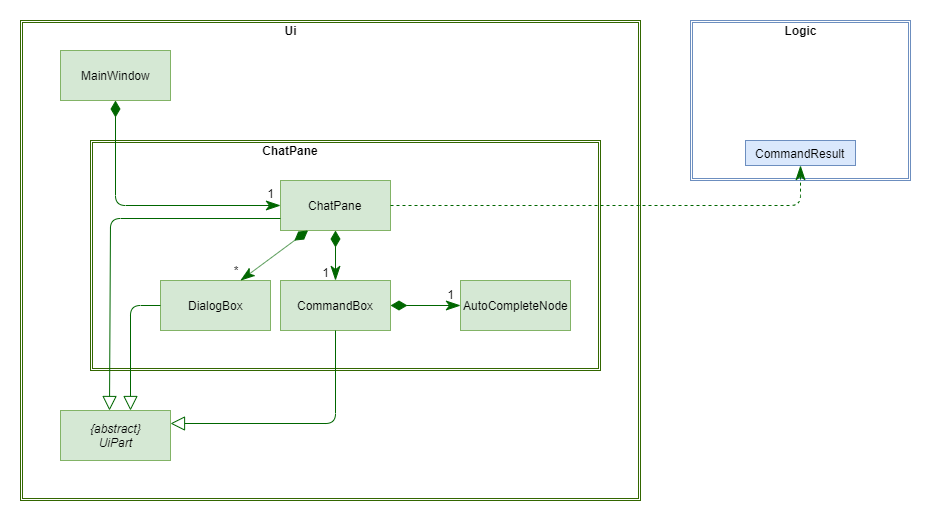
-
The
ResultPanedisplays a relevantResultViewbased on the command entered. The following class diagram shows a partial view of the component with only theNoteListResultViewandContactListResultView.
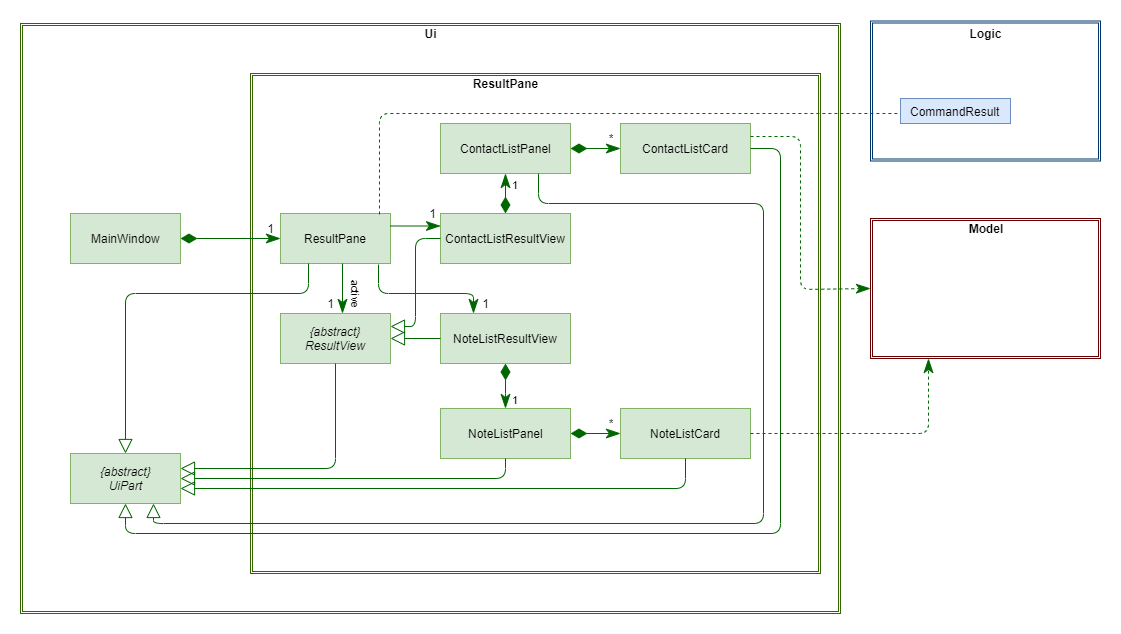
Most of these classes, including the MainWindow itself, inherit from the abstract UiPart class.
The UI component uses JavaFx UI framework. The layout of these UI parts are defined in matching .fxml files that are in the src/main/resources/view folder. For example, the layout of the MainWindow is specified in MainWindow.fxml
The UI component,
-
Executes user commands using the
Logiccomponent. -
Displays feedback and updates the
ResultPaneusingCommandResultin theLogiccomponent. -
Listens for changes to
Modeldata so that the UI can be updated with the modified data.
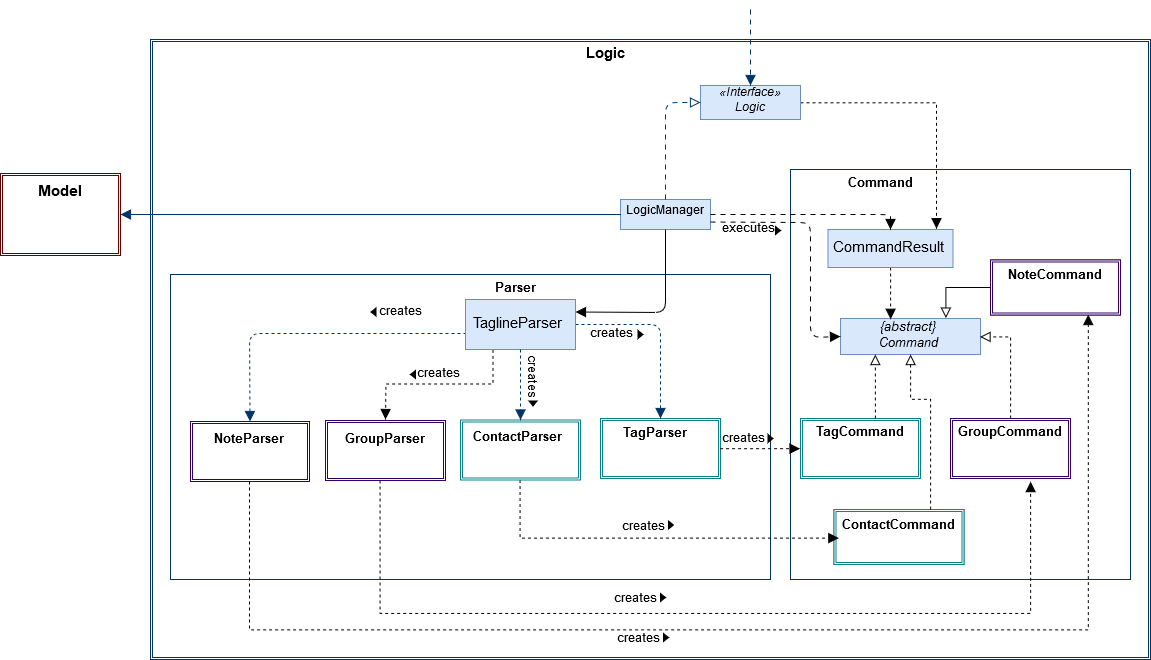
2.3. Logic component
API :
Logic.java
-
Logicuses theTaglineParserclass to parse the user command. -
The user command is passed to different command parser based on the command type. E.g. "note delete 1" will be passed to
NoteCommandParser -
This results in a
Commandobject which is executed by theLogicManager. -
The command execution can affect the
Model(e.g. adding a note). -
The result of the command execution is encapsulated as a
CommandResultobject which is passed back to theUi. -
In addition, the
CommandResultobject can also instruct theUito perform certain actions, such as displaying help to the user.
2.3.1. Contact Logic component
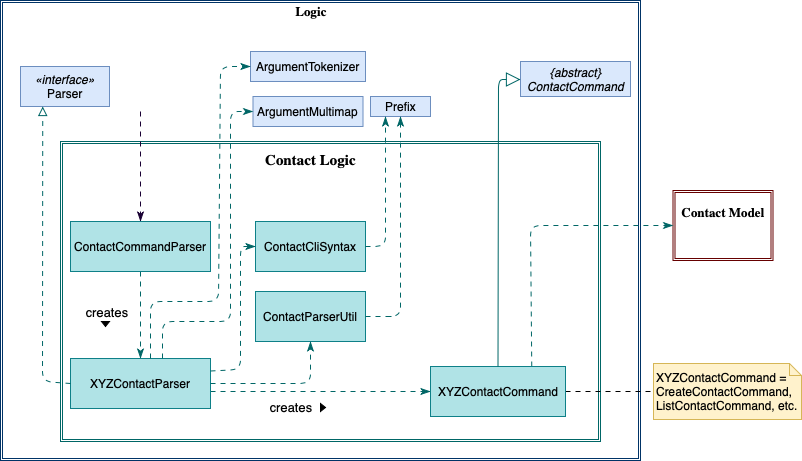
-
Contact Logicis a sub-component ofLogic. -
TaglineParserwill pass a user input that can be classified as a contact command (i.e. has "contact " prefix), to theContactCommandParserwithout including the "contact" keyword, e.g.TaglineParserwill only pass "create --n Bob" instead of "contact create --n Bob". -
ContactCommandParseridentifies the type of contact command and passes the argument string to the respective command parser. For example,ContactCommandParserwill pass "--n Bob" toCreateContactParserif it receives "create --n Bob" as an input. -
This results in a
ContactCommandobject which is returned to theLogicManager. -
The command execution can affect the
ContactModel.
Given below is the Sequence Diagram for interactions within the Logic component for the
execute("contact create --n Bob") API call.
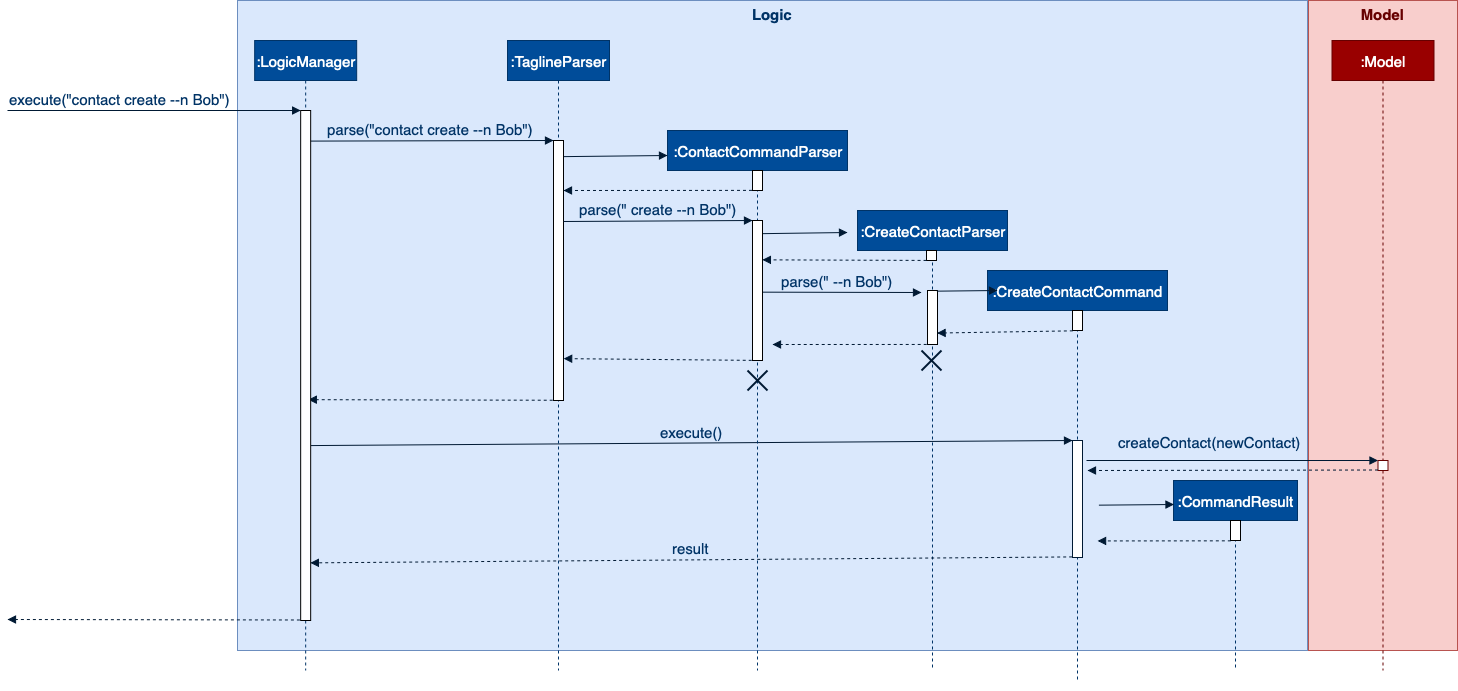
contact create --n Bob Command2.3.2. Note Logic component
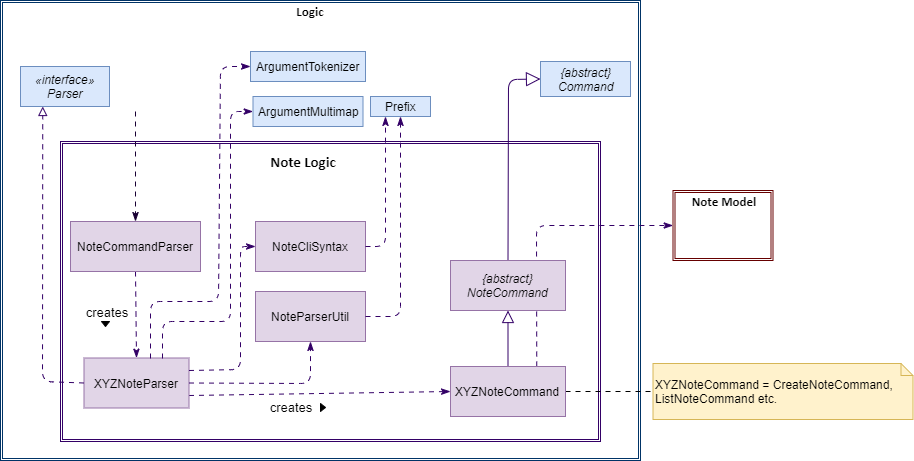
-
Note Logicis a sub-component ofLogic. -
It obtains the user command parsed by
TaglineParserthrough theNoteCommandParserclass. -
The user command is passed to the respective command parser. E.g. "note delete 1" will be passed to
DeleteNoteParser. -
This results in a
NoteCommandobject which is returned to theLogicManager. -
The command execution can affect the
NoteModel(e.g. adding a note).
Given below is the Sequence Diagram for interactions within the Logic component for the execute("note delete 1") API call.
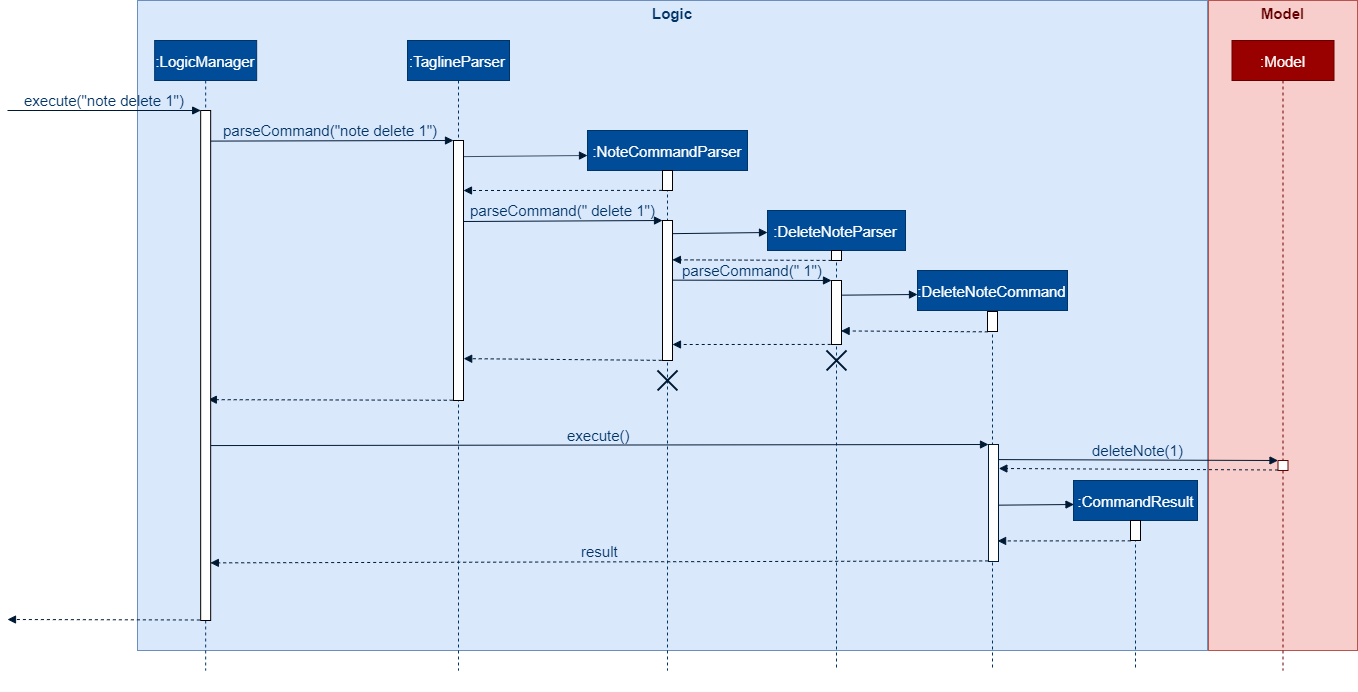
note delete 1 Command2.3.3. Group Logic component
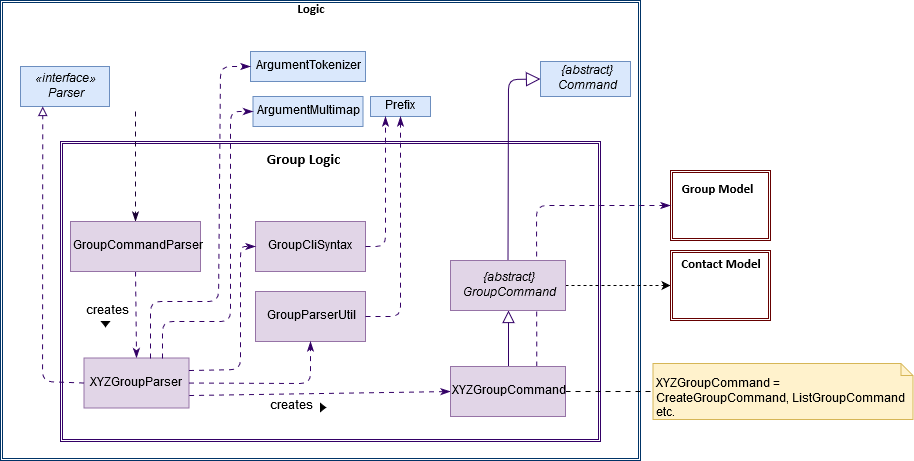
-
Group Logicis a sub-component ofLogic. -
It obtains the user command parsed by
TaglineParserthrough theGroupCommandParserclass. -
The user command is passed to the respective command parser. E.g. "group delete x1" will be passed to
DeleteGroupParser. -
This results in a
GroupCommandobject which is returned to theLogicManager. -
The command execution can affect the
GroupModel(e.g. adding a group). -
The command execution can affect the
ContactModel(e.g. displaying contacts in a group).
Given below is the Sequence Diagram for interactions within the Logic component for the execute("group delete x1") API call.
2.4. Model component
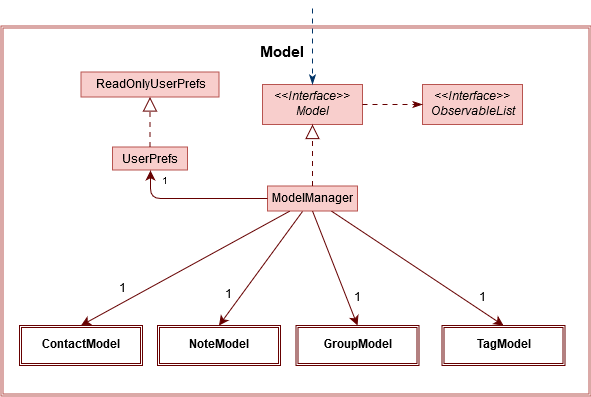
API : Model.java
The Model,
-
stores a
UserPrefobject that represents the user’s preferences. -
manages Address Book data through
ContactModelsub-component. -
manages Note Book data through
NoteModelsub-component. -
manages Group Book data through
GroupModelsub-component. -
manages Tag Book data through
TagModelsub-component.
2.4.1. Contact Model component
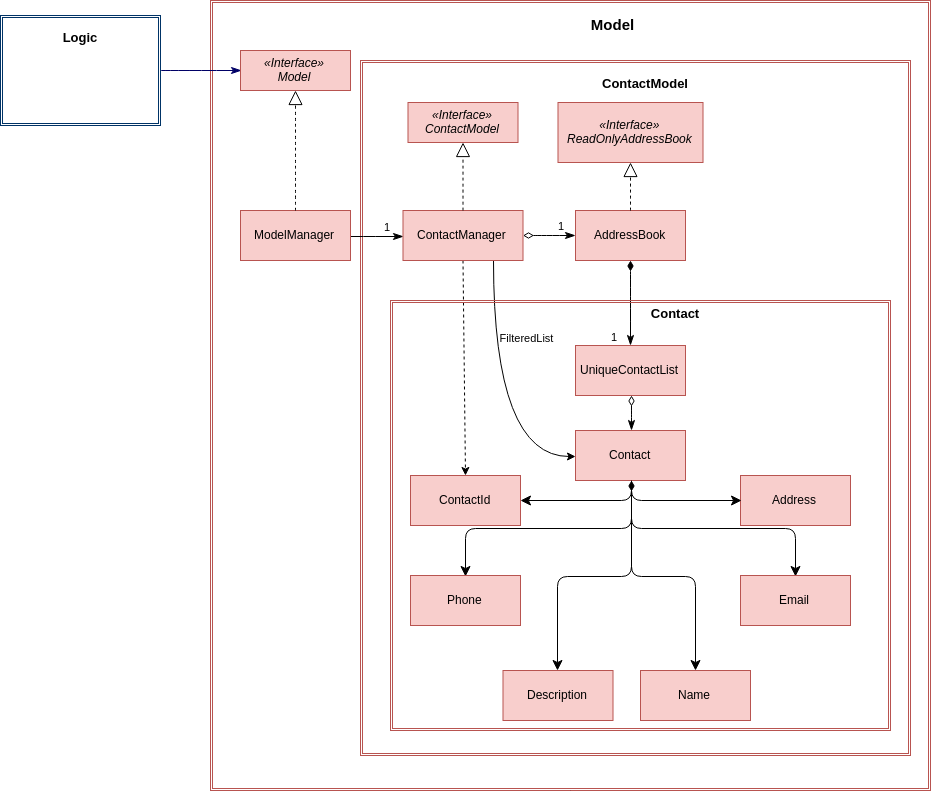
API : ContactModel.java
The ContactModel,
-
stores the Address Book data.
-
exposes an unmodifiable
ObservableList<Contact>which can be accessed fromModelthat can be 'observed' e.g. the UI can be bound to this list so that the UI automatically updates when the data in the list change. -
does not depend on any of the other three components.
2.4.2. Note Model component
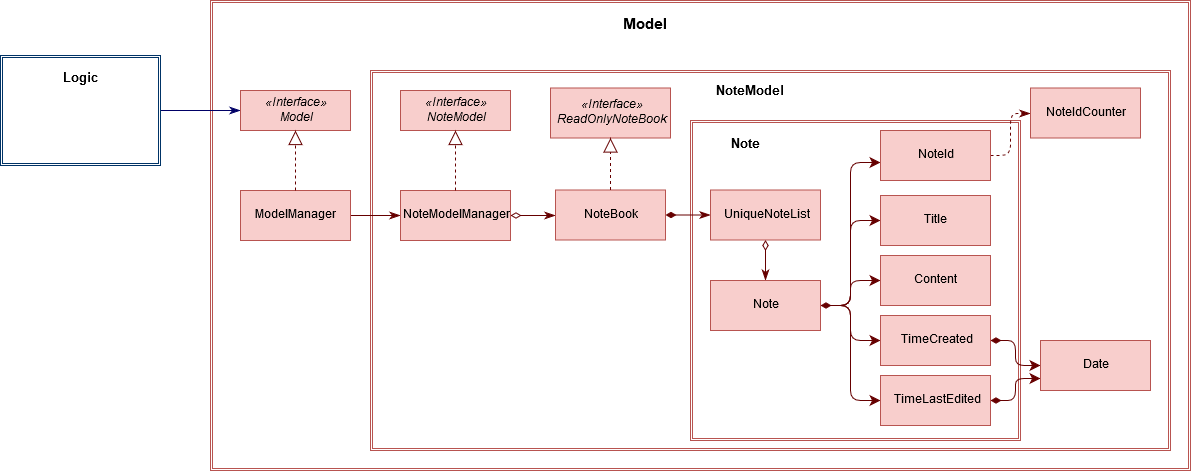
API : NoteModel.java
The NoteModel,
-
stores the Note Book data.
-
exposes an unmodifiable
ObservableList<Note>which can be accessed fromModelthat can be 'observed' e.g. the UI can be bound to this list so that the UI automatically updates when the data in the list change. -
does not depend on any of the other three components.
As an additional feature to be implemented in the future, we can store a Tag list in Note. This would allow Note to be able to be better categorized.
|
2.4.3. Group Model component
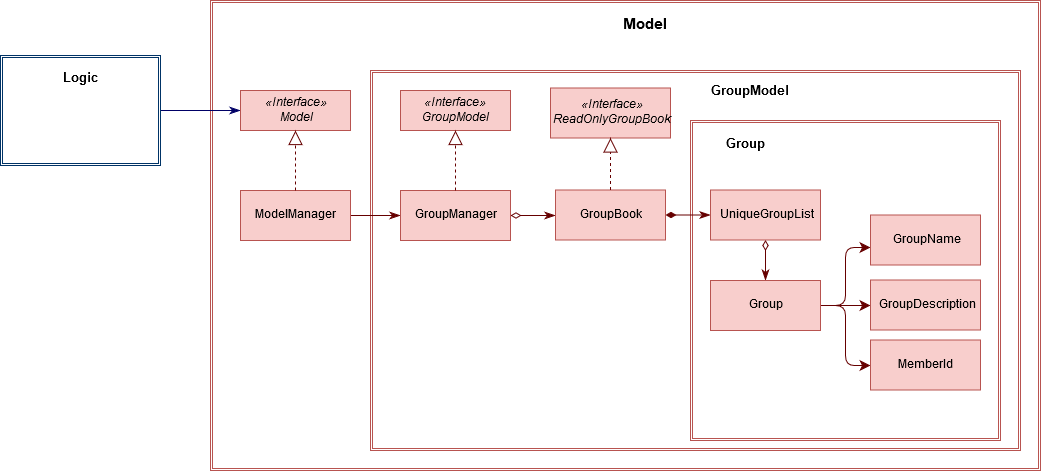
API : GroupModel.java
The GroupModel,
-
stores the Group Book data.
-
exposes an unmodifiable
ObservableList<Group>which can be accessed fromModelthat can be 'observed' e.g. the UI can be bound to this list so that the UI automatically updates when the data in the list change. -
does not depend on any of the other three components.
2.5. Storage component
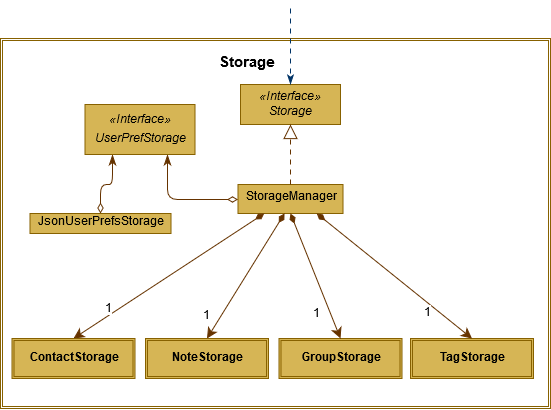
API : Storage.java
The Storage component,
-
can save
UserPrefobjects in json format and read it back.
2.5.1. Contact Storage component
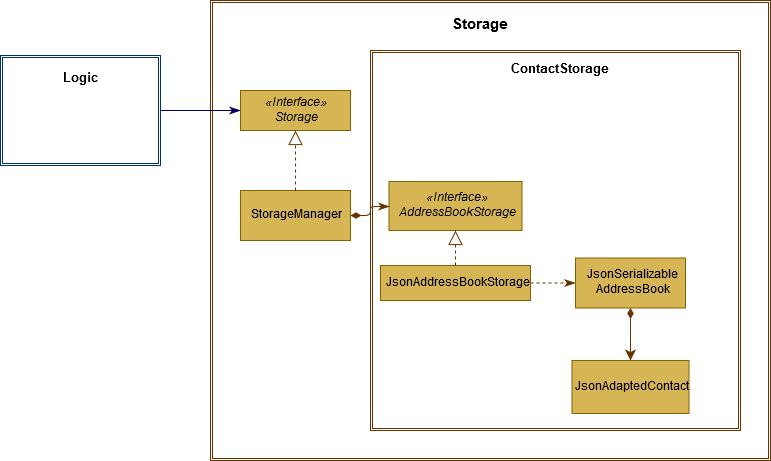
API : ContactBookStorage.java
The ContactStorage component,
-
can save the Address Book data in json format and read it back.
2.5.2. Note Storage component
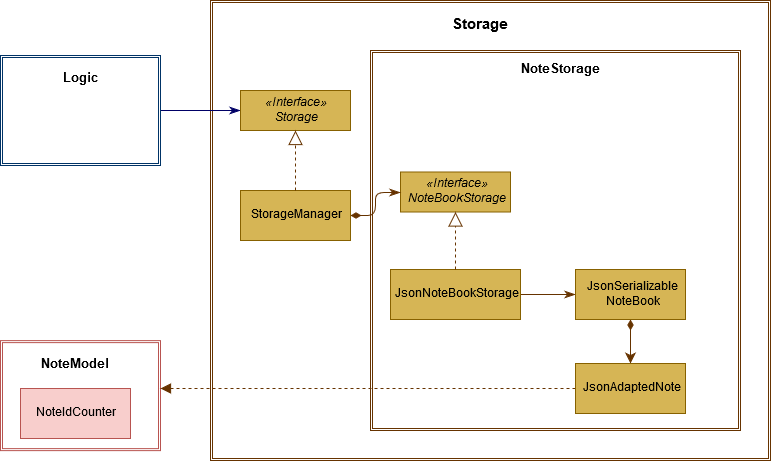
API : NoteBookStorage.java
The NoteStorage component,
-
can save
Noteobjects in json format and read it back. -
can save
NoteIdCounterstate in json format and read it back. -
can save the Note Book data in json format and read it back.
2.5.3. Group Storage component
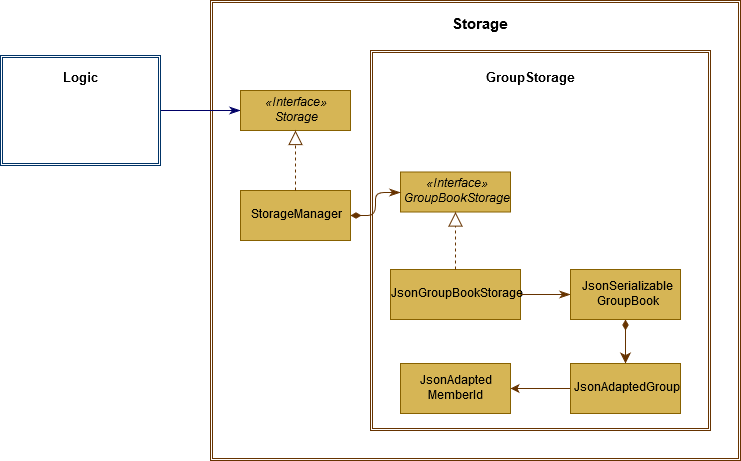
API : GroupBookStorage.java
The GroupStorage component,
-
can save
Groupobjects in json format and read it back. -
can save the Group Book data in json format and read it back.
2.5.4. Tag Storage component
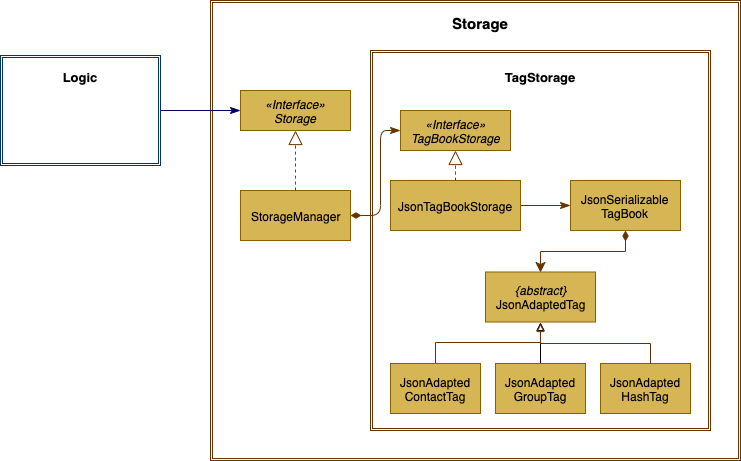
API : TagBookStorage.java
The TagStorage component,
-
can save
Tagobjects in json format and read it back. -
can save the Tag Book data in json format and read it back.
2.6. Common classes
Classes used by multiple components are in the tagline.commons package.
3. Implementation
This section describes some noteworthy details on how certain features are implemented.
3.1. User Prompting
3.1.1. Description
When the user enters an incomplete command, the command could be missing only a few compulsory fields. Instead of forcing the user to edit the command entirely, TagLine will prompt the user for further details instead.
At this point, the user may abort the command or provide the requested details. When all details are provided, the command is executed.
3.1.2. Implementation
Representing a prompt
The prompting mechanism uses Prompt objects to represent individual queries for additional information. A list of Prompt objects is used to pass information between the Logic and Ui components. Prompt contains the following fields:
-
prefix: The prefix of the missing field (e.g. for acontact createcommand, thenamefield has prefix--n) -
question: A question to ask the user for details regarding the missing information -
response: The response from the user
These fields are accessible through getters and setters in the Prompt class.
Passing the prompts
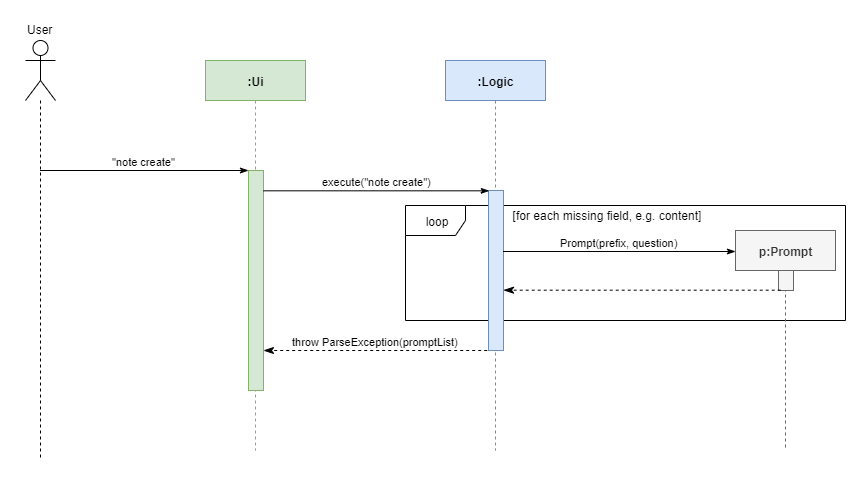
Given below is an example scenario where the user command has missing compulsory fields.
Step 1: The Ui passes the user’s command to Logic, which finds one or more missing compulsory fields. For each missing field, it creates a new Prompt object with a question. Then it throws a ParseException containing the list of Prompt objects.
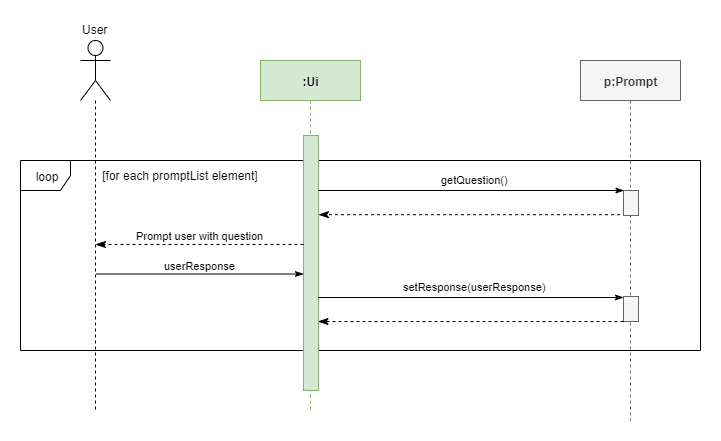
Step 2: The Ui receives the list of Prompt objects. For each Prompt, it retrieves the question and obtains the corresponding user feedback using the mechanism here.
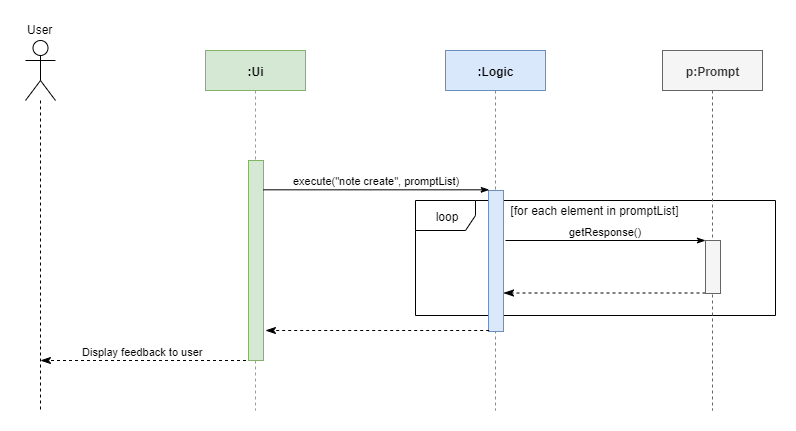
Step 3: The Ui passes the original command, together with the processed Prompt objects, back to Logic. Logic then executes the corrected command.
The full sequence diagram is shown below:
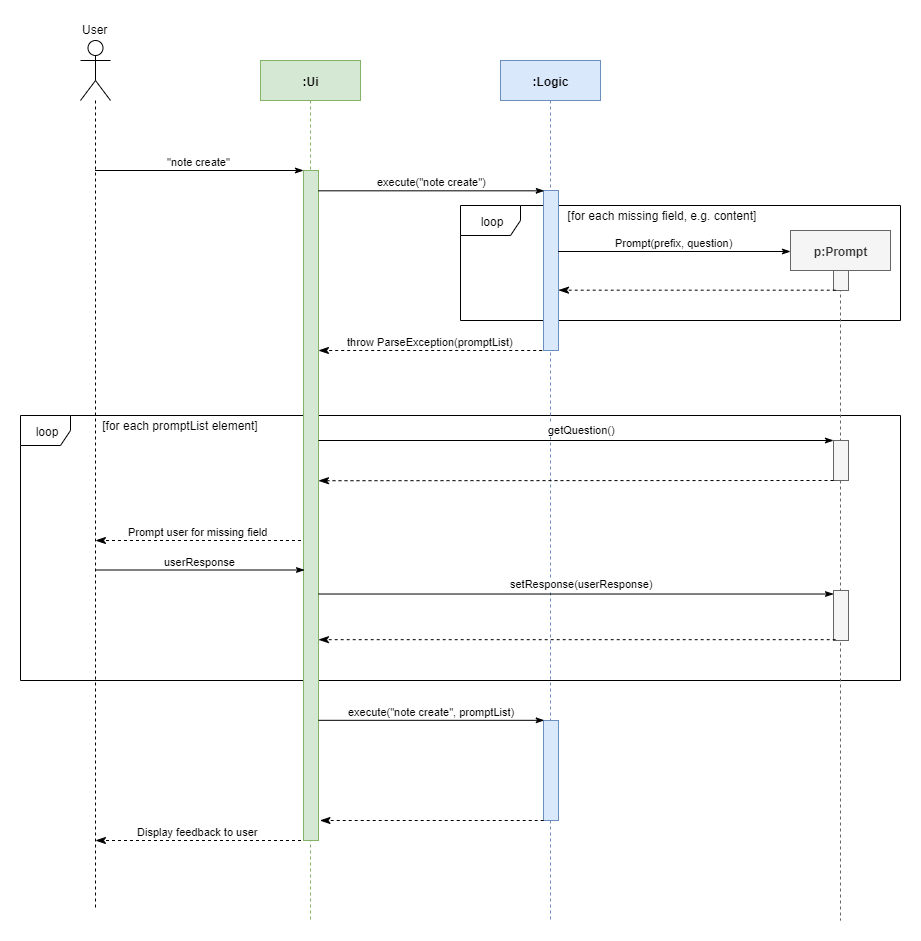
The user can also abort the command by pressing the Escape button. In this case, the Ui will discard the original command and continue to receive further user commands.
Getting responses from the user
To obtain responses to a list of prompts, the UI uses a PromptHandler to indicate the incomplete command that it is currently working on. PromptHandler uses the Iterator design pattern to fill a list of prompts. It implements the following operations:
-
PromptHandler#getPendingCommand: Returns the incomplete command -
PromptHandler#fillNextPrompt: Fills the next unfilled prompt in the list -
PromptHandler#getNextPrompt: Gets the question of the next unfilled prompt in the list -
PromptHandler#isComplete: Returns true if all prompts have been filled -
PromptHandler#getFilledPromptList: Gets the filled prompt list
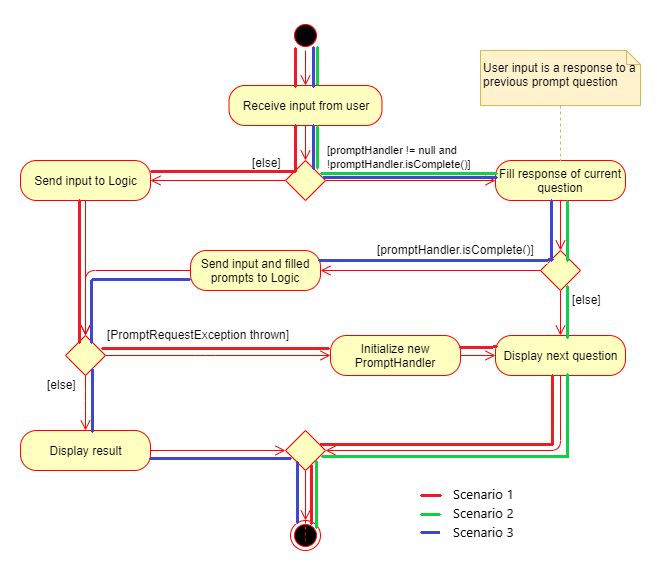
To allow the Ui to handle user prompts, the sequence of steps taken to handle user input has been modified. To illustrate the program flow, three possible scenarios of user input will be discussed.
-
The user enters some input with missing compulsory fields.
-
The input is passed to
Logic, where aPromptRequestExceptionis thrown. -
MainWindowtakes the list of prompts in thePromptRequestException, and creates a newPromptHandlerin the private fieldpromptHandler. -
MainWindowgets the first prompt question frompromptHandlerand displays it.
-
-
The user is currently being prompted, and enters some input to answer a prompt. There are more prompts remaining.
-
MainWindowhas apromptHandlerwhich is incomplete. It callsfillNextPromptwith the user input. -
MainWindowchecks thatpromptHandleris still incomplete. -
MainWindowgets the next prompt question frompromptHandlerand displays it.
-
-
The user is currently being prompted, and enters some input to answer a prompt. There are no more prompts remaining.
-
MainWindowhas apromptHandlerwhich is incomplete. It callsfillNextPromptwith the user input. -
MainWindowchecks thatpromptHandleris now complete. -
MainWindowcallsgetPendingCommandandgetFilledPromptListofpromptHandler. -
The incomplete command and the filled prompt list are passed to
Logicto execute the command.
-
The cases above are labelled and summarized in the full activity diagram below. The mechanism for aborting commands is done using listeners and not shown below.
3.1.3. Design Considerations
Aspect: Prompt handling method
-
Alternative 1: The
Uifunctions as per before and is unaware of prompting. TheLogickeeps track of the incomplete command and sends prompts back asCommandResultobjects.-
Pros: Decreases coupling between
UiandLogiccomponents -
Cons: Violates the Single Responsibility Principle for
CommandResult, i.e.CommandResultmay now have to change because of changes to the prompting featureUihas no way to know if it is currently handling prompting, so it cannot abort prompts, disable/enable autocomplete or display special messages.
-
-
Alternative 2: The
Logiccomponent keeps track of the incomplete command and throws an exception containing prompts to theUi.-
Pros: Greater flexibility for
Uito handle prompts, e.g. aborting -
Cons:
LogicManagerhas to keep track of the command entered, rather than simply acting as a bridge between theUiand theParsersub-component. Increases number of potential points of failure and decreases maintainability.
-
-
Alternative 3: The
Logiccomponent requests prompts from theUi. TheUicomponent keeps track of the incomplete command.-
Pros: Greater flexibility for
Uito handle prompts, e.g. aborting
-
Alternative 3 was chosen as it allows for flexibility in prompt handling while having Ui be the sole component responsible for collecting prompt responses.
Aspect: Command correction method
-
Alternative 1: The
Uiupdates the command with the user’s responses by adding the new data to the command string.-
Pros: No need to overload
Logic#execute()andParser#parse()methods -
Cons: Requires
Uito know where to insert preambles, and increases coupling betweenUiandLogiccomponents (asUinow needs to know and follow the command format)
-
-
Alternative 2: The
LogicManagerupdates the command with the user’s responses by adding the new data to the command string.-
Pros: No need to overload
Parser#parse()method -
Cons: Requires
LogicManagerto know where to insert preambles, and reduces flexibility of prompting
-
-
Alternative 3:
TaglineParserand the individual parser classes handle the list ofPromptobjects when parsing the command-
Pros: Easily handles preambles, and also allows greater extensibility of the prompt feature, e.g. can have the user fix incorrect commands or confirm actions
-
Cons: Requires changing multiple
Parserclasses, may increase code duplication
-
Alternative 3 is chosen as it allows the confirmation messages for the clear commands to be implemented easily.
For Alternative 1 and 2, implementing confirmation would inadvertently add an alternative command to directly perform the action. To illustrate, suppose we check for confirmation for the contact clear command by having the user type YES. Then due to the mechanism of the prompting feature, we will inadvertently include a new command like contact clear <prefix> YES. Since this is unintuitive, alternative 3 was chosen instead.
3.2. Group Contacts feature
3.2.1. Description
Groups allows users to better organize contacts into relevant social circles (represented as Group)
to better express relationships much like how they exists as in real life. This feature
would provide the foundation for further more advanced features such as tagging of notes with
group tags.
The user can work with groups by using the commands as detailed in the group section.
Commands currently available:
-
group create- creates a new group -
group remove- removes a contact from a group -
group add- adds an existing contact to the group -
group list- list all available groups -
group find- searches for group by exact name and displays contacts in the group -
group delete- disbands a group (contacts in group are not deleted)
3.2.2. Implementation
The grouping feature is facilitated by GroupBook, an additional Model component in addition to the current AddressBook.
It extends the functionality of AddressBook by providing a way to group contacts together into unique Group classes
identified by their GroupName. This allows users to form more natural associations of
contacts such as "BTS-members". Identifying which contacts are group members of a Group is done by
storing a record of their ContactId in the Group.
Additionally, GroupManager extends Tagline with the following operations to support
commands dealing with groups:
-
GroupManager#getGroupBook()— Retrieves a view only version of the groups for storing data after app quits. -
GroupManager#deleteGroup()— Deletes a group from the list of groups currently available. -
GroupManager#addGroup()— Adds a group to the list of groups currently available. -
GroupManager#setGroup()— Replaces a group in the list of groups with another group. -
GroupManager#getFilteredGroupList()— Returns a view only list of groups containing a subset of available Groups. -
GroupManager#updateFilteredGroupList()— Specifies which groups will be retrieved byGroupManager#getFilteredGroupList().
The above operations are exposed in the Model interface by their respective method names.
-
GroupCommand#findOneGroup()— Retrieves one Group with name matching the exact provided String. -
GroupCommand#verifyMemberIdWithModel()— Compares members currently in a group with contacts inAddressBookand returns only those found inAddressBook. -
GroupCommand#setDifference()— Used to get contactids specified which do not exist inAddressBook.
These above are static utility functions which form the underlying structure of how a GroupCommand works.
Given below is an example usage scenario on how a typical lifecycle of a Group behaves at each step.
With emphasis on showing the effects of DeleteCommand as an example of a command from ContactCommand
would interact with GroupCommand and GroupModel state.
Step 1. The user initially has several contacts in AddressBook.
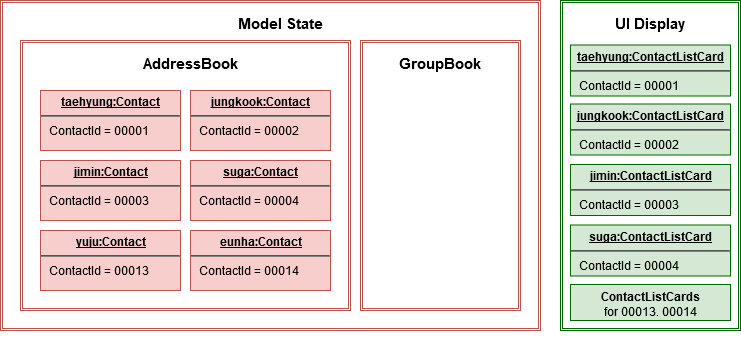
The AddressBook model state contains all the Contact class that exists in the App.
Since no Group has been created yet, GroupBook model state is currently empty.
All of the contacts found in AddressBook are displayed on the UI by default.
Step 2. Wishing to better organize her contacts into groups, the user executes group create BTS calling
CreateGroupCommand. to create a new Group instance with no members.
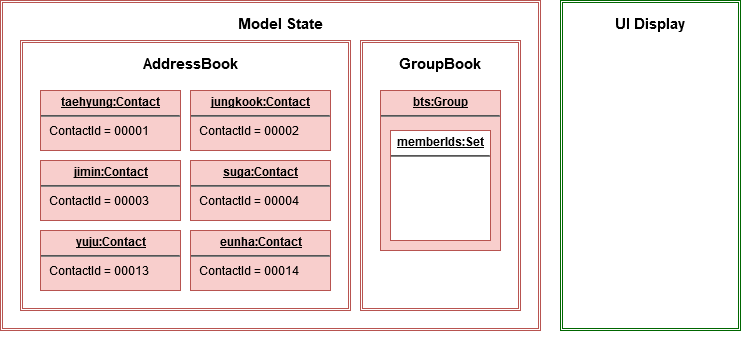
The GroupBook model state now contains a Group instance for "BTS" with no members
recorded as memberIds.
Any command regarding Group would prompt the UI to display the contacts in the group.
A group with no members would cause the UI to be empty. As there are no contacts in the group.
While a group with members in it would cause UI to display all the contacts belonging
to that group.
Step 3. The user then executes group add BTS --i 00001 --i 00002 --i 0013 --i 0004
calling the addMembersToGroupCommand to add several contacts to the group. Only the String
representation of the ContactId will be stored in the Group.
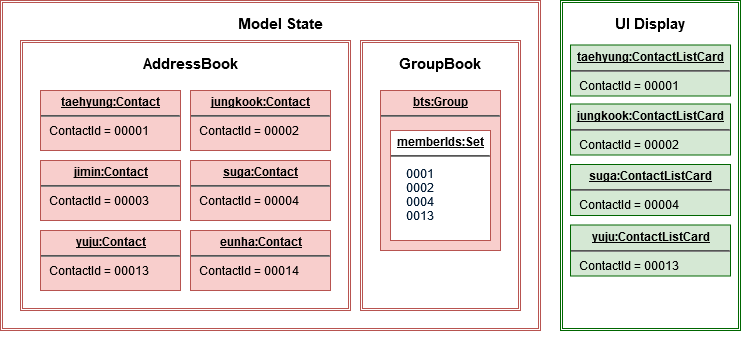
Group "BTS" now has members in it and the UI would display all the contacts found in the
group.
Step 4. The user realizes she has made a mistake adding a wrong contact and in a fit of rage
chooses to delete the contact instead of merely removing the contact from the Group.
Executing contact delete 00013
which then deletes the Contact with contactId of 00013.
However, this does not remove the contact’s id from
the memberId attribute in the Group the contact was in. This step does not involve GroupModel in any way.
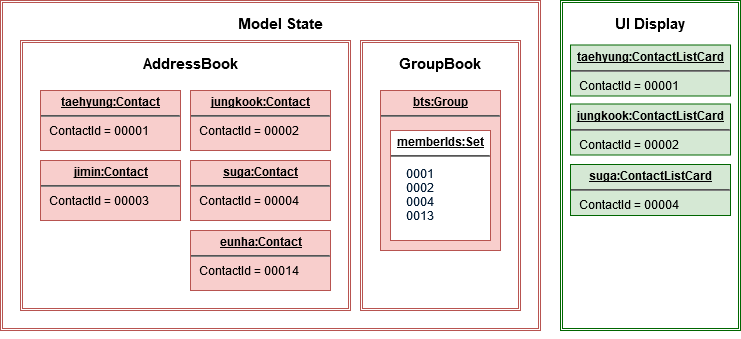
Deleting a Contact would cause it to be removed from AddressBook model state and the Contact
no longer exists. Due to the contact command, the active UI shifts to displaying a list
of contacts (not illustrated here for simplicity) and the groups as shown in the image
are actually not visible to the user. However behind the scenes, while
the UI no longer has contact of 00013, it is still recorded as a member
in GroupBook model state. The updating of GroupBook model state is deferred.
Step 5. The user then executes group add BTS --i 00003 to add the correct contact as a member on the Group
and view the Contact profiles.
This calls AddMemberToGroupCommand which then updates the Group ensuring that all memberIds correspond to an existing
ContactId found in AddressBook. The contacts of the group are also displayed to the user.
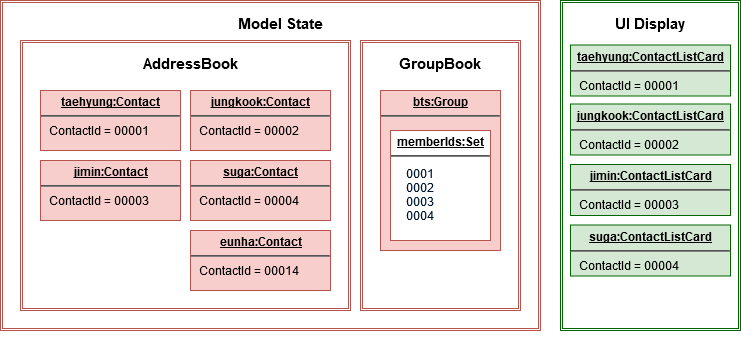
Here, the GroupBook model state is updated and memberId of 00013 from the previous step is removed while Contact
with contactId of 00003 is added into the Group. This change is also reflected in the UI
which changes back to group display now that a group command is issued.
Now all is as it should be in Group "BTS".
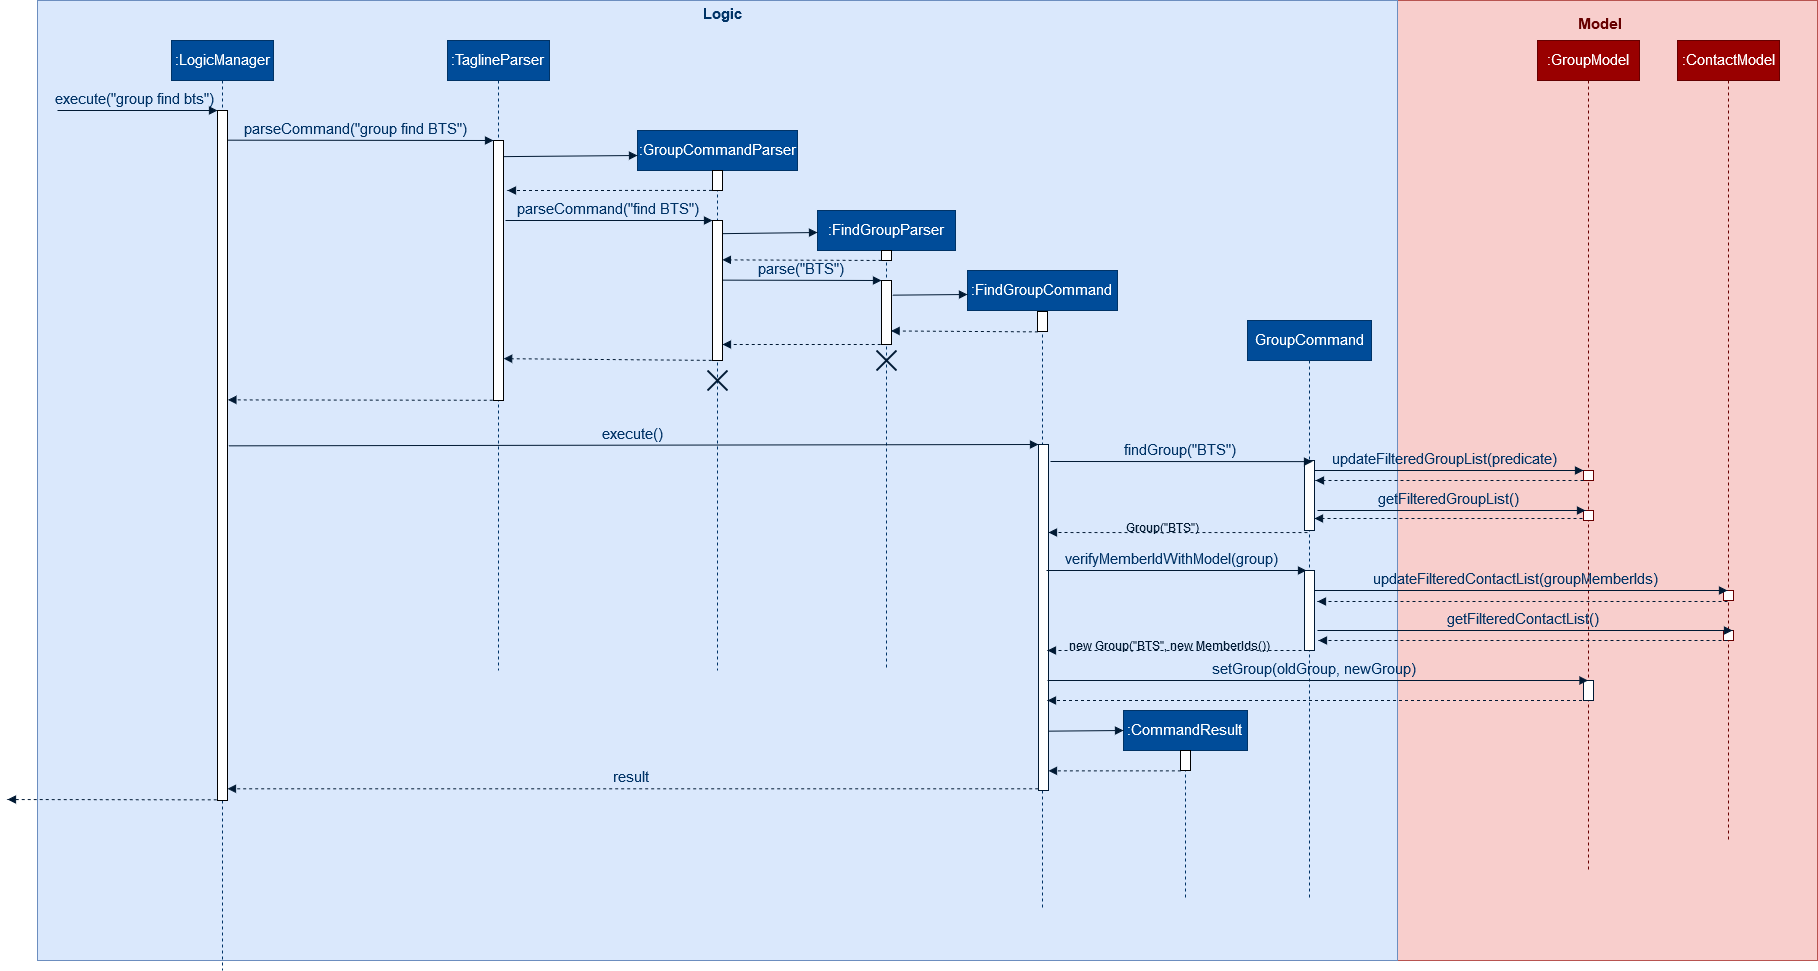
The following sequence diagram summarizes what happens when a user executes a FindGroupCommand which
which updates the Group similar to how AddMemberToGroupCommand does in the above example:
FindGroupCommand to view contacts in a Group3.2.3. Design Considerations
Aspect: How groups stores contacts
-
Alternative 1: Stores
ContactIdclass in aCollectioninGroup-
Pros: Easy to get
ContactIdfromGroupto retrieveContactclasses fromAddressbook. -
Cons: Increases coupling to implementation of
Contact. Storage and retrieval after reloading the app would also cause new instances ofContactIdto be created when loadingGroupor would require more complicated loading ofGroupfrom storage having to happen afterAddressBookis loaded and having to referenceContactclasses to ensure the sameContactIdclass is referenced by bothContactandGroupit is in.
-
-
Alternative 2 (current choice): Stores
Collectionof Strings which are able to uniquely identifyContact.-
Pros: Group classes are less coupled to implementation of
Contact. Simpler to loadGroupclasses from storage. due to not needing to check and obtain a reference toContactId. User input is also parsed as Strings. -
Cons: Deciding when to check if members are still part of a
Groupsince it need not be done at loading time. While it is more flexible, can be a potential source of confusion as it may be possible to forget to update the members inGroup.
-
3.3. Tagging feature
3.3.1. Description
The user can tag a note with many tags by using note tag command.
3.3.2. Implementation
In order to add tagging feature we will need to take a look at two processes, which are the tag command creation and the execution of the command.
Creating Tag Command
We will use a TagParserUtil to create a tag from user input.
Given below is an example scenario when a user tag a note with 2 tags.
Step 1: The user command will be passed to TaglineParser, all the way to the TagNoteParser.
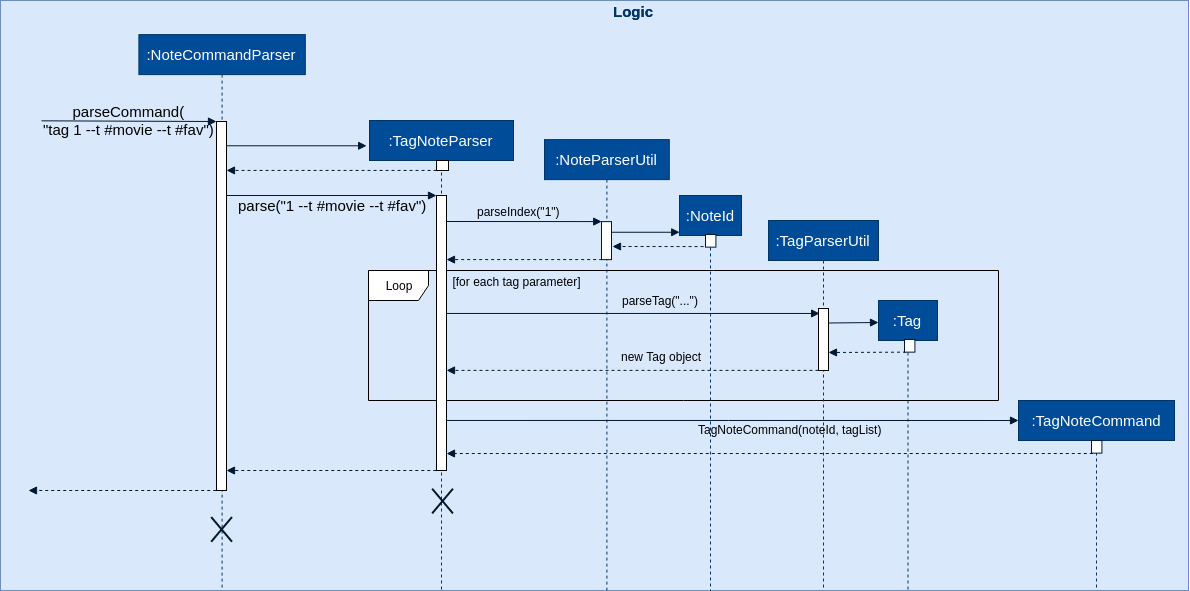
Step 2: NoteParserUtil will be used to create a noteId object.
Step 3: Finally, TagParserUtil will be used to create tag objects. All of them will be aggregated inside a
tagList before being passed to the TagNoteCommand Constructor.
This whole process has created a TagNoteCommand object from user input.
Executing Tag Command
Now, we will take a look on how we are executing the tagging command.
Given below is an example scenario when the tagging command gets executed.
Step 1: The TagNoteCommand interact with NoteManager through model to find the note to be tagged.
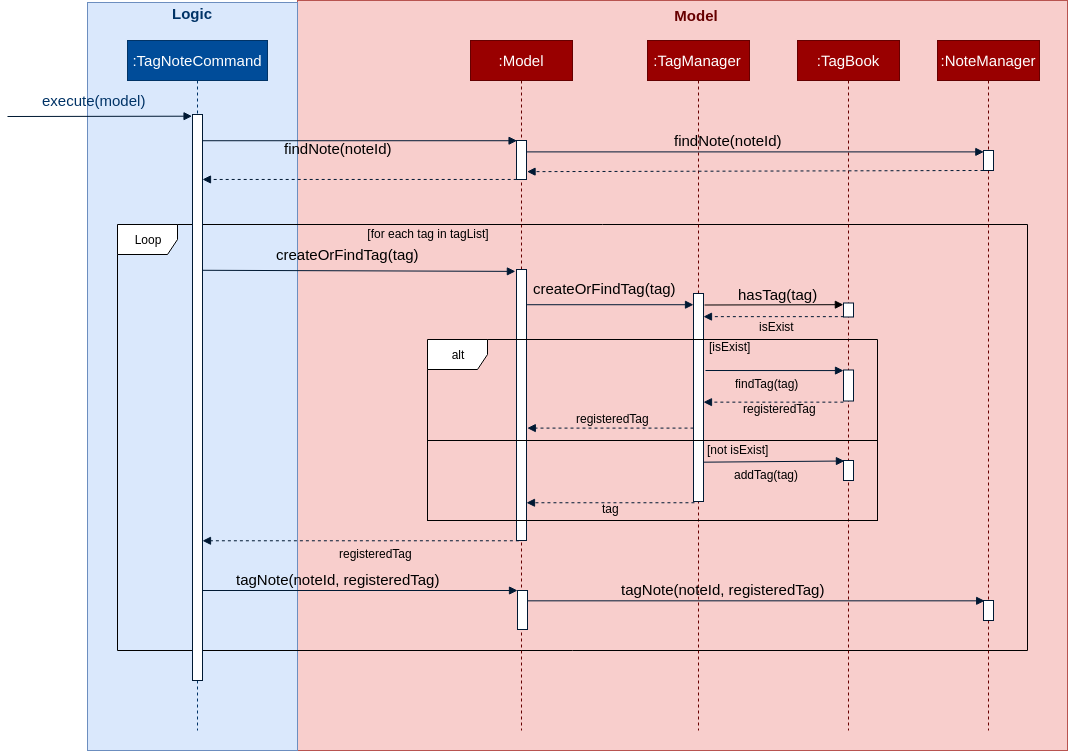
Step 2: The TagNoteCommand then exchange each tag with another tag which is registered inside the model.
Internally, model will have to interact with TagManager which will find the registered tag or register one if it does
not exist inside model.
Step 3: Finally, the note will be tagged with the registered tag using model.
This whole process has successfully executed the TagNoteCommand.
3.4. Note filtering feature
3.4.1. Description
The user can filter notes by providing a filter in the note list command.
Types of filter:
-
No prefix - filter by String keyword
-
Prefix
#- filter by hashtag -
Prefix
@- filter by contact -
Prefix
%- filter by group
3.4.2. Implementation
The note filter mechanism is facilitated by the NoteFilter class.
It contains the filter value and the enum FilterType.
A NoteFilter is generated by the NoteFilterUtil inner class in ListNoteParser and passed into ListNoteCommand.
ListNoteCommand then creates a Predicate based on the filter and updates the list of notes in the UI via Model.
Filter by String keyword
Filter by keyword is facilitated by the following classes:
-
KeywordFilter- implementation ofNoteFilterthat is passed intoListNoteCommand -
NoteContainsKeywordsPredicate-Predicatepassed intoModel#updateFilteredNoteList()to list only notes that contain the keywords.
Given below is an example scenario where the user enters a command to filter notes by keywords.
Step 1: The user command is passed through the LogicManager to ListNoteParser. ListNoteParser checks the input arguments and identify the String keywords.
The keywords are passed into NoteFilterUtil#generateKeywordFilter() which returns a KeywordFilter containing the keywords and FilterType.KEYWORD.
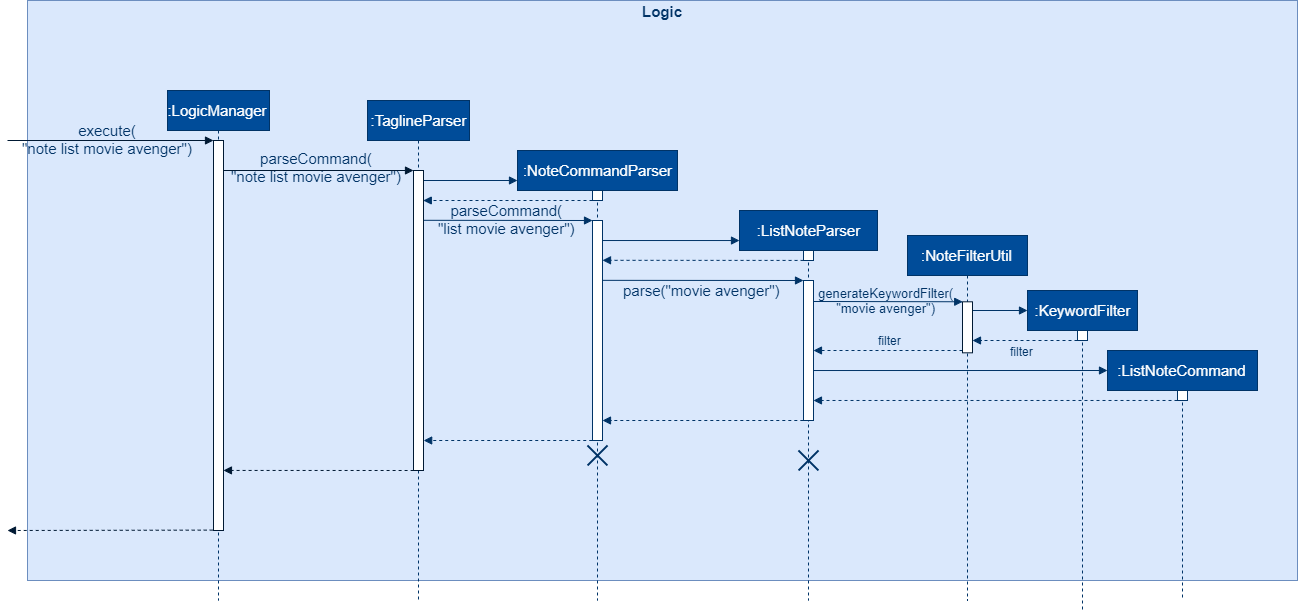
note list user command to obtain a ListNoteCommandStep 2: The ListNoteCommand returned will be executed by the LogicManager. If a NoteFilter exists and is of FilterType.KEYWORD, ListNoteCommand#filterAndListByKeyword() will be called.
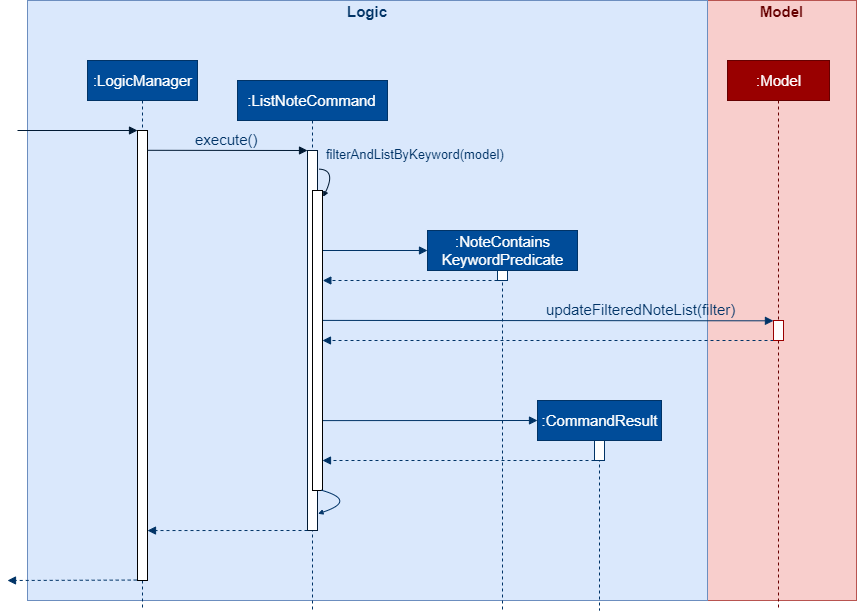
ListNoteCommand to update filtered note list by keyword in ModelThe method will create a NoteContainsKeywordsPredicate and update the list of notes to be displayed via Model#updateFilteredNoteList().
Filter by Tag
Filter by Tag is facilitated by the following classes/methods:
-
TagParserUtil#parseTag()- to obtain theTagobjects from the user input tag strings -
TagFilter- implementation ofNoteFilterthat is passed intoListNoteCommand -
NoteContainsTagsPredicate-Predicatepassed intoModel#updateFilteredNoteList()to list only notes that is tagged by specifiedTag
Given below is an example scenario where the user enters a command to filter notes by tag.
Step 1: Similar to filtering by keyword, the user command is passed to the ListNoteParser. The ListNoteParser checks the input arguments and identify the tag strings.
The tag strings are passed into NoteFilterUtil#generateTagFilter(). TagParserUtil#parseTag() is called to get Tag from the tag string. TagFilter containing the list of tags and FilterType.TAG is returned.
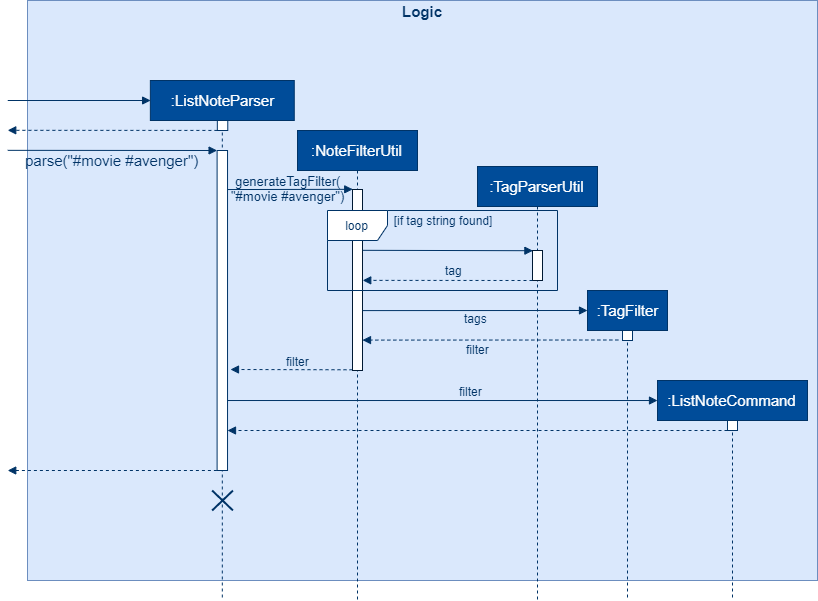
ListNoteCommandStep 2: The ListNoteCommand returned will be executed by the LogicManager. If a NoteFilter exists and is of FilterType.TAG, ListNoteCommand#filterAndListByTag() will be called.
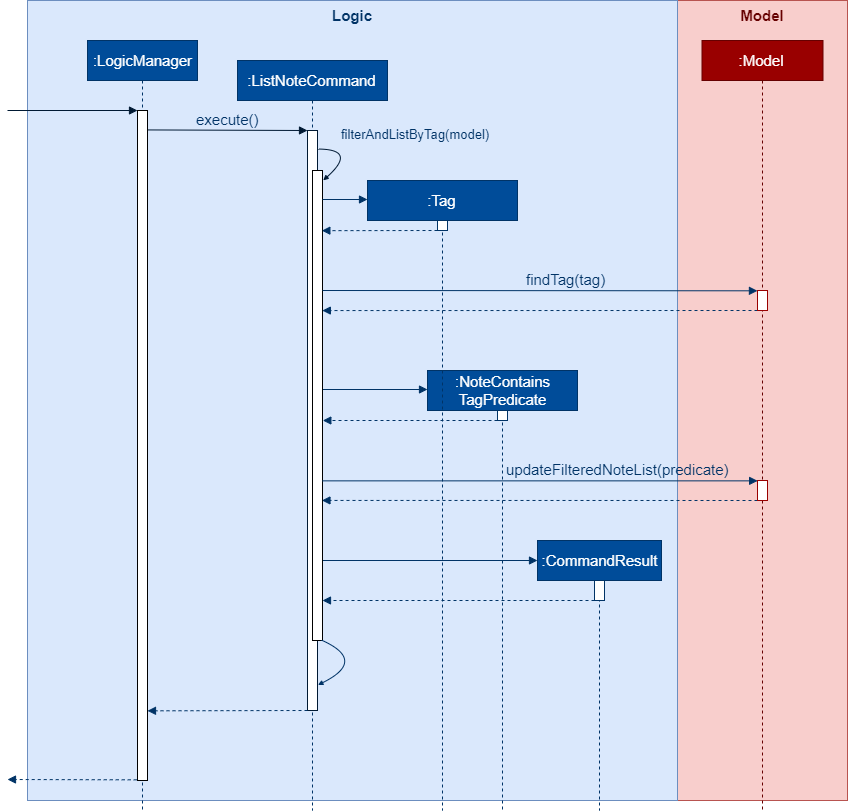
ListNoteCommand to update filtered note list by Tag in ModelThe method will check if the tags in the NoteFilter exists via Model#findTag(). If a Tag does not exist, an error message will be displayed.
If all tags exist, the tags will be passed into the NoteContainsTagsPredicate and update the list of notes to be displayed via Model#updateFilteredNoteList().
3.5. Contact Profile feature
3.5.1. Description
The user can view all notes that are associated with a certain contact with contact profile feature. A note is considered to be associated with a contact X if it satisfies one of the following criteria:
-
The note is tagged with a contact tag that represents X.
-
The note is tagged with a group tag where the represented group has X as one of its members.
This feature takes advantage of the existing note tag command by having these two types of tags:
-
Contact tag:
-
Use
@symbol as the tag prefix. -
Represents a contact using its id.
-
Usage example:
@12345. This represents a contact with id12345.
-
-
Group tag:
-
Use
%symbol as the tag prefix. -
Represents a group using its name.
-
Usage example:
%cs2103t. This represents a group with namecs2103t.
-
The user can use contact show command to display the profile of a contact.
A contact profile contains all the stored information (e.g. email and address) and notes that are associated with that contact.
3.5.2. Implementation
The tags that represent contact and group are facilitated by the
ContactTag and
GroupTag classes.
Whenever a user uses note tag command to tag a note with any type of tag, part of the input that
represents the value of tag (i.e. follows --t TAG format) will be passed into
TagParserUtil. The parser will
handle the translation based on the first non-whitespace character into a
Tag object, which is possible to be either
ContactTag or GroupTag.
Meanwhile, the mechanism to display a contact profile is facilitated by the
ShowContactCommand class.
This command takes a contact id as parameter and stores it inside the object. Upon execution,
the command will ask Model for all groups that
contain the given contact as one of their members. Afterward, it will filter notes based on contact id and
all the group names that are converted into Tag objects.
Parsing for contact and group tags
Parsing for contact and group tags are handled by
TagParserUtil as described
in the tagging feature section. Differences between input format with other type of tag (i.e. hash tag) is only the
first character where contact tag uses @ symbol and group tag uses % symbol.
However, the main difference is in the implementation of
Tag#isValidInModel, which is an abstract method that needs
to be implemented by every concrete subclass of Tag.
The following are how this method is implemented in contact and note tags:
-
Contact tag determines its validity in the model by calling
Model#findContact, which takes aContactIdas parameter and returns an optional object ofContactthat has the specified contact id. If such contact object exists, a contact tag is considered valid. -
Group tag determines its validity in the model by calling
Model#hasGroupName, which takes aGroupNameas parameter and returns a boolean whether such group name exists in the data stored by Tagline or not.
Creating the command
Given below is an example scenario where the user enters a command to show a contact profile.
Step 1: Similar to other contact commands, the user command is first passed to TaglineParser to identify its type
until it finally arrives at ShowContactParser which will create the command object. The ShowContactParser also checks
the input arguments to make sure it follows the basic format.
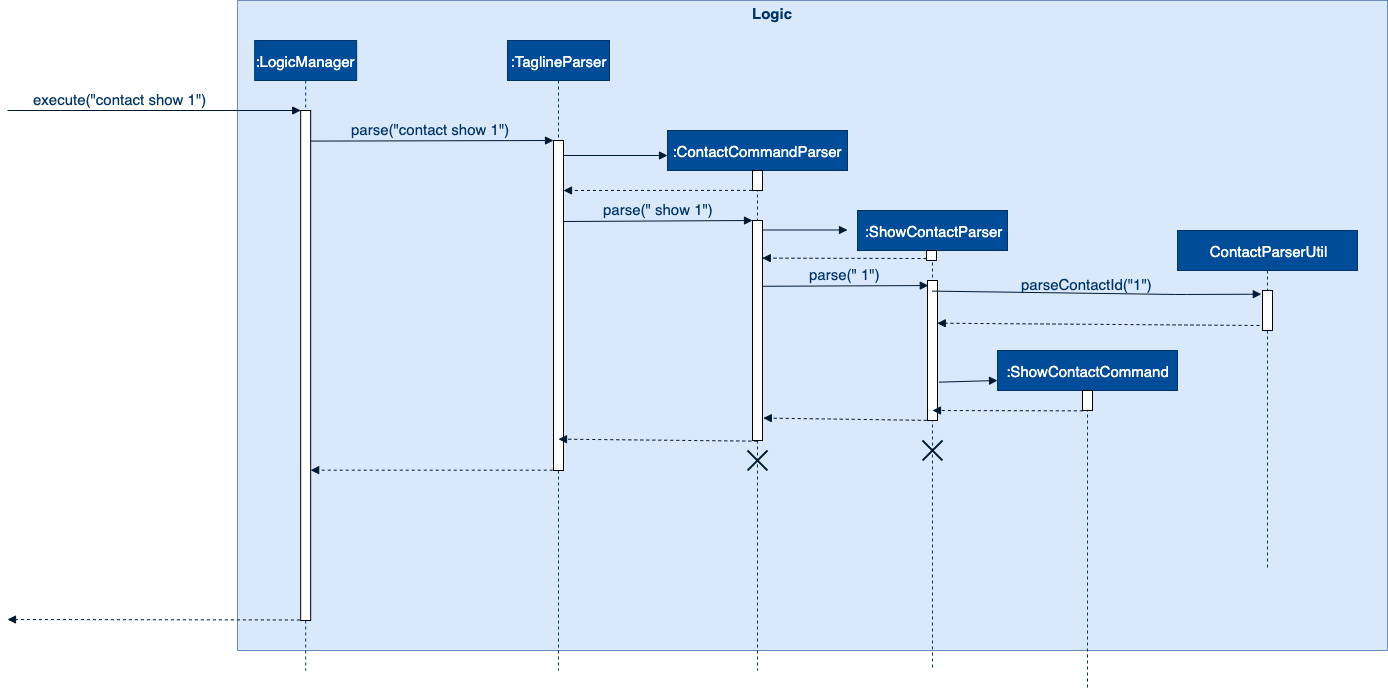
ShowContactCommandExecuting the command
When executing of ShowContactCommand,
there will be an initial check whether the provided contact id is valid or not by calling
Model#findContact similar with checking validity for contact tag.
If the provided contact id is invalid (e.g. non existing contact), the execution will stop and directly return a
CommandResult which informs about the error.
Suppose now we only consider the contact show command that is provided with valid contact id. During execution, it will
translate the contact id into
ContactIdEqualsSearchIdPredicate and
NoteContainsTagsPredicate objects.
Afterwards, those predicate will be used to update the observable contact and note list, by calling
Model#updateFilteredContactList and
Model#updateFilteredNoteList.
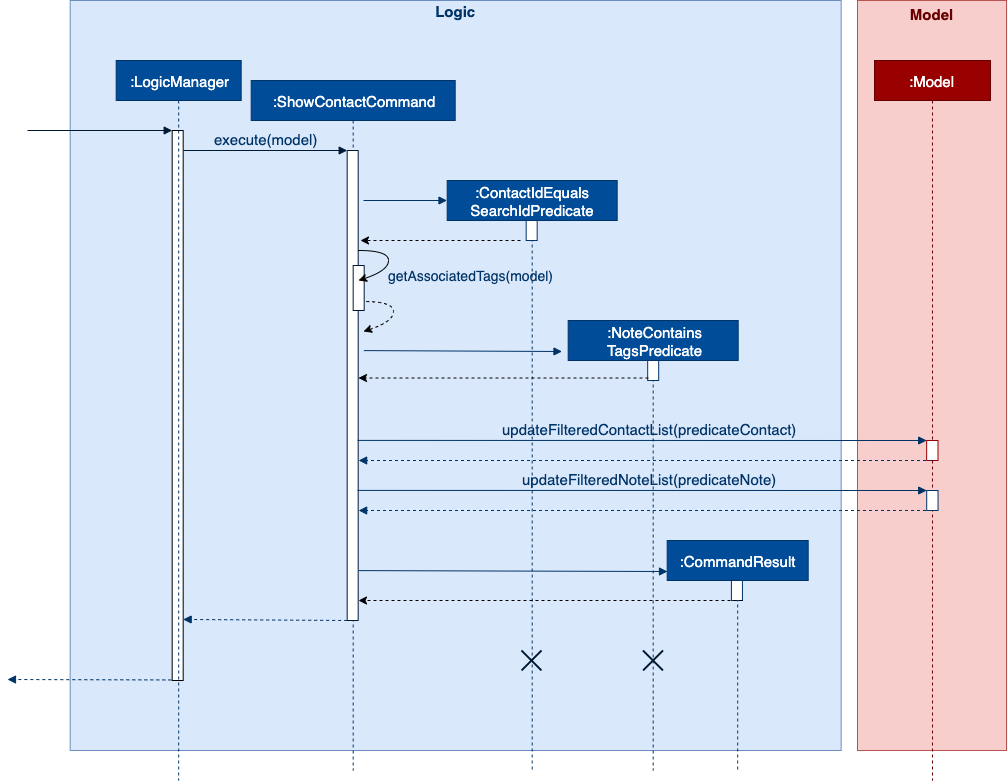
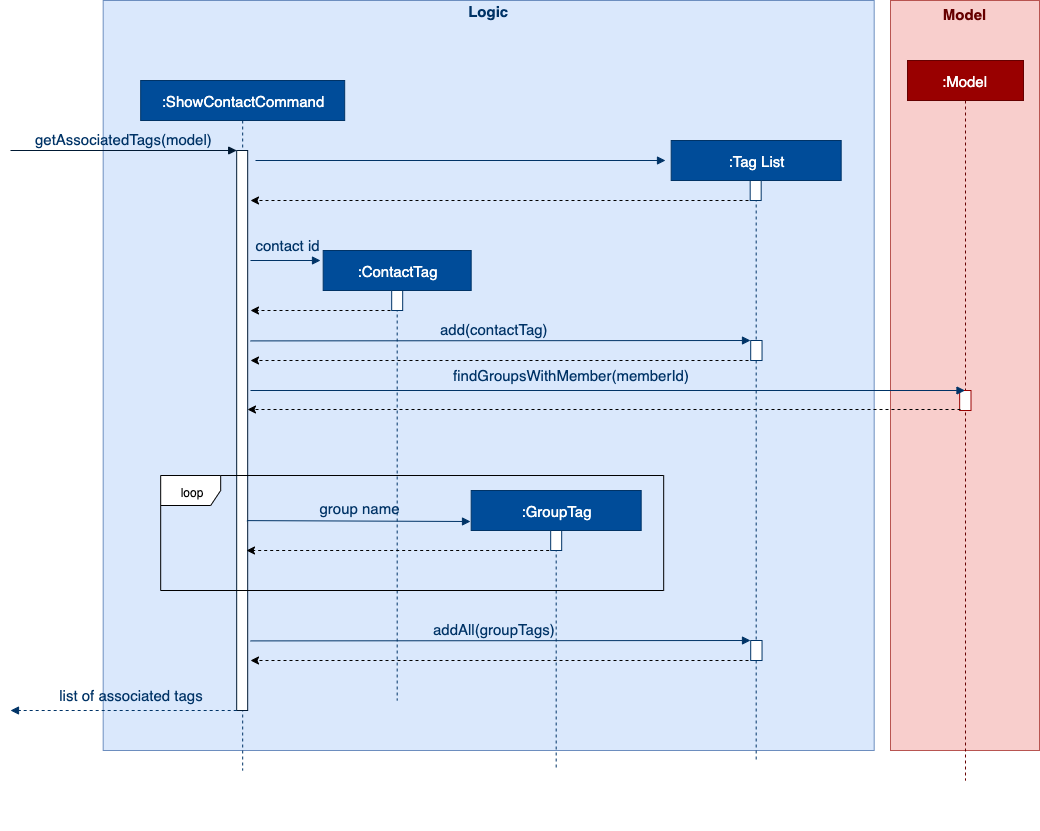
contact show command.During translation from contact id to multiple tags, the command objects will call
Model#findGroupsWithMember to get all groups that contain
the specified contact id as one of its members. Afterwards, it creates a single array of tags that represent all tags
that are associated with the contact id.
A successful execution of ShowContactCommand
will return a CommandResult that indicates
a view change into ContactProfileResultView.
The result view for contact profile observes the changes on observable contact and note lists to update accordingly.
3.6. Logging
We are using java.util.logging package for logging. The LogsCenter class is used to manage the logging levels and logging destinations.
-
The logging level can be controlled using the
logLevelsetting in the configuration file (See Section 3.7, “Configuration”) -
The
Loggerfor a class can be obtained usingLogsCenter.getLogger(Class)which will log messages according to the specified logging level -
Currently log messages are output through:
Consoleand to a.logfile.
Logging Levels
-
SEVERE: Critical problem detected which may possibly cause the termination of the application -
WARNING: Can continue, but with caution -
INFO: Information showing the noteworthy actions by the App -
FINE: Details that is not usually noteworthy but may be useful in debugging e.g. print the actual list instead of just its size
3.7. Configuration
Certain properties of the application can be controlled (e.g user prefs file location, logging level) through the configuration file (default: config.json).
4. Documentation
Refer to the guide here.
5. Testing
Refer to the guide here.
6. Dev Ops
Refer to the guide here.
Appendix A: Product Scope
Our product is targeted at users who:
-
Need to manage a large variety of notes related to multiple categories
-
Need to manage large numbers of team projects or relationships
-
Want to keep their notes organized
-
Prefer desktop applications over mobile applications
-
Prefer typing commands over using graphical interfaces
Value proposition: TagLine manages notes faster than a typical mouse/GUI driven app
Appendix B: User Stories
Priorities: High (must have) - * * *, Medium (nice to have) - * *, Low (unlikely to have) - *
| Priority | As a … | I want to … | So that I can… |
|---|---|---|---|
|
user |
add a new contact |
|
|
user |
edit a contact |
update outdated information |
|
user |
delete a contact |
remove entries that I no longer need |
|
user |
find a contact by name |
locate details of contacts without having to go through the entire list |
|
user |
view all contacts in a group |
|
|
user |
add new notes |
|
|
user |
edit a note |
fix typos or incorrect details |
|
user |
delete a note |
clean up my app |
|
user |
tag my notes |
group related notes together |
|
user |
view all notes according to tags |
view only notes related to an issue |
|
user |
view all notes related to a contact |
discuss these notes with them when I meet them |
|
user |
group my contacts |
manage contacts for different occasions better |
|
user |
view all notes related to a group |
|
|
user |
view all notes related to groups as well when querying for a person |
view all information associated with that person at a glance |
|
user with many friends with the same name |
be able to differentiate them easily |
locate a specific person |
|
user |
archive old notes |
keep them while not cluttering my app page |
|
user |
export all my data and create a backup |
keep my data somewhere safe |
|
new user |
get suggestions when typing commands |
do not need to memorize commands |
|
user |
embed links in my notes |
directly access relevant webpages |
|
user |
associate photos with notes |
store and view related photos and notes together |
|
user |
add text styles |
personalize my entries |
|
user |
colour entries with the same tag |
organize my notes better |
|
user |
prompted for correction when I make typos |
fix my command without re-typing it entirely |
|
user |
prompted for confirmation when I delete or edit notes or contacts |
avoid making irreversible mistakes |
|
user |
list all notes by chronological order |
view most relevant notes first |
|
user |
lock notes with authentication |
keep my notes secure |
Appendix C: Use Cases
(For each of the use cases below, the System is TagLine and the Actor is the user, unless specified otherwise)
The use cases are divided into categories using the following naming convention:
-
UCC for contact-related use cases
-
UCN for note-related use cases
-
UCE for error handling use cases.
UCC01 Add person
MSS
-
User requests to add a contact.
-
TagLine adds the contact to the contact list.
Use case ends.
Extensions
-
1a. UCE01 Invalid command syntax
-
1b. UCE02 Missing compulsory fields
UCC02 Add group
MSS
-
User requests to create a new group.
-
TagLine creates the group.
Use case ends.
Extensions
-
1a. UCE01 Invalid command syntax
-
1b. UCE02 Command with missing compulsory fields
Use case ends.
UCN01 Add note
MSS
-
User requests to add a new note.
-
TagLine creates the note.
-
TagLine displays the newly created note.
Use case ends.
Extensions
-
1a. UCE01 Invalid command syntax
-
1b. User does not include a tag for the note
-
1b1. TagLine prompts user if the user wants to add a tag.
-
1b2. User either adds a tag or declines.
Use case resumes at step 2.
-
UCN02 Add tag to note
MSS
-
User requests to tag a currently existing note
-
TagLine adds the tag to the note.
-
TagLine displays the edited note.
Use case ends.
Extensions
-
1a. UCE01 Invalid command syntax
-
1b. UCE03 Command with ambiguous field
UCE01 Invalid command syntax
MSS
-
User inputs an invalid command.
-
TagLine requests correction from the user.
-
User corrects the command.
-
TagLine executes the command.
Use case ends.
UCE02 Command with missing compulsory fields
MSS
-
User inputs a command with missing compulsory fields.
-
TagLine prompts user for a missing field value.
-
User inputs the field value.
Until all missing field values are inputted.
-
TagLine executes the command.
Use case ends.
Extensions
-
2a. User aborts the command.
-
2a1. TagLine confirms the abort.
Use case ends.
-
UCE03 Command with ambiguous field
MSS
-
User inputs a command with an ambiguous field value (e.g. name).
-
TagLine prompts user with a list of suggested values and their unique IDs.
-
User inputs the ID.
-
TagLine executes the command.
Use case ends.
Extensions
-
2a. User aborts the command.
-
2a1. TagLine confirms the abort.
Use case ends.
-
Appendix D: Non Functional Requirements
-
Should work on any mainstream OS as long as it has Java
11or above installed. -
Should be able to hold up to 1000 contacts without a noticeable sluggishness in performance for typical usage.
-
Should be able to display large amounts of text quickly, i.e. up to 10MB of text data within 2 seconds
-
Command syntax should not exceed 10 distinct terms, in order to avoid user confusion.
Appendix F: Instructions for Manual Testing
Given below are instructions to test the app manually.
| These instructions only provide a starting point for testers to work on; testers are expected to do more exploratory testing. |
F.1. Autocomplete
-
Looking at autocomplete options
-
Test case: Type a valid partial command, e.g.
c,coorcontact del.
Expected: The autocomplete popup will suggest the next word. Socontactwill be suggested forcandco, andcontact deletewill be suggested forcontact del. -
Test case: Type an invalid partial command, e.g.
dorcontact qqq
Expected: The autocomplete popup disappears. -
Test case: Use the arrow keys to navigate down to an option in the autocomplete popup. Press Enter or use the mouse to select it.
Expected: The command box displays the auto-completed string.
-
Note
The autocomplete menu will only pop up after the user types in the command box. It will disappear after clicking elsewhere on the screen or selecting an autocomplete option.
F.2. Prompting
-
Requesting additional information from the user
-
Test case:
contact create
Expected: The chat pane will show two dialogs from TagLine. The first dialog will indicate that the user is being prompted, and the second will ask for the contact name.
Continuation:Bob
Expected: A contact named 'Bob' will be created. -
Test case:
note tag
Expected: The chat pane will show two dialogs from TagLine. The first dialog will indicate that the user is being prompted, and the second will ask for the note ID.
Continuation:1(or any valid note ID)
Expected: The chat pane will display another dialog from TagLine, asking for a tag.
Continuation:#TEST(or any valid tag)
Expected: The note with ID 1 will be tagged with the tag#TEST. -
Test case:
contact delete
Expected: TagLine will ask for the contact ID.
Continuation: Enter any invalid ID.
Expected: An error message will be shown. -
Test case:
contact delete
Expected: TagLine will ask for the contact ID.
Continuation: Press the escape key.
Expected: A special message will be shown indicating that the command has been aborted.
-
F.3. Creating a note
-
Creating a new note
-
Test case:
note create --T TagLine Testing
Expected: Message on successful creation of note displayed with details of the note. The note created appears in the list of notes in the list pane on the right. -
Test case:
note create --c This is a creation of a note
Expected: Similar to previous. -
Test case:
note create --T TagLine Testing --c This is a creation of a note
Expected: Similar to previous. -
Test case:
note create --T TagLine Testing --c This is a creation of a note --t #testing
Expected: Similar to previous. The note created shown in the note list reflects the tag "#testing". -
Test case:
note create
Expected: No note is created. A message asking for the note content is displayed.-
Subsequent action: Enter
This is a creation of a note. Expected: Message on successful creation of note displayed with details of the note. The note created appears in the list of notes in the list pane on the right.
-
-
Test case:
note create
Expected: No note is created. A message asking for the note content is displayed.-
Subsequent action: Press enter without any text. Expected: No note is created. An error message is returned with the error details. Command is highlighted red in the command box.
-
-
Test case:
note create --T This is a title of too many characters, more than 50
Expected: No note is created. An error message is returned with the error details. Command is highlighted red in the command box.
-
F.4. Deleting a note
-
Deleting a note
-
Test case:
note delete 1
Expected: Note with the id of "1" is deleted from the note list. A message indicating successful note deletion is displayed with the details of deleted note.
*An assigned note id is static, deleted note id are not reassigned. -
Test case:
note delete 1(Ensure note with ID '1' is has been removed)
Expected: No note is deleted. An error message is displayed with the error details. Command is highlighted red in the command box. -
Test case:
note delete a
Expected: Similar to previous. -
Test case:
note delete X(Where X is an is a number not used as a note id i.e -1)
Expected: Similar to previous.
-
F.5. Editing a note
-
Editing the sample note with id 2 upon launch
-
Prerequisite: Ensure the sample notes appear in the application and note #2 is an untitled note.
-
Test case:
note edit
Expected: No note is edited. An error message is displayed with the error details. Command is highlighted red in the command box. -
Test case:
note edit 2
Expected: Similar to previous. -
Test case:
note edit 2 --c(With a space after '--c' as the prefix is '--c ')
Expected: Similar to previous. -
Test case:
note edit 2 --c Team Meeting - Wed 4pm
Expected: Message on successful edit of note displayed with details of the note. The note edited is reflected in the list of notes in the list pane on the right. -
Test case:
note edit 2 --T CS2103T Meeting
Expected: Similar to previous.
-
F.6. Listing and filtering notes
-
Listing all notes
-
Prerequisite: Change list pane to list other information. E.g.
contact list -
Test case:
note list
Expected: Message on successful listing is displayed. All notes are listed in the list pane on the right pane.
-
-
Filtering notes by keywords in content
-
Test case:
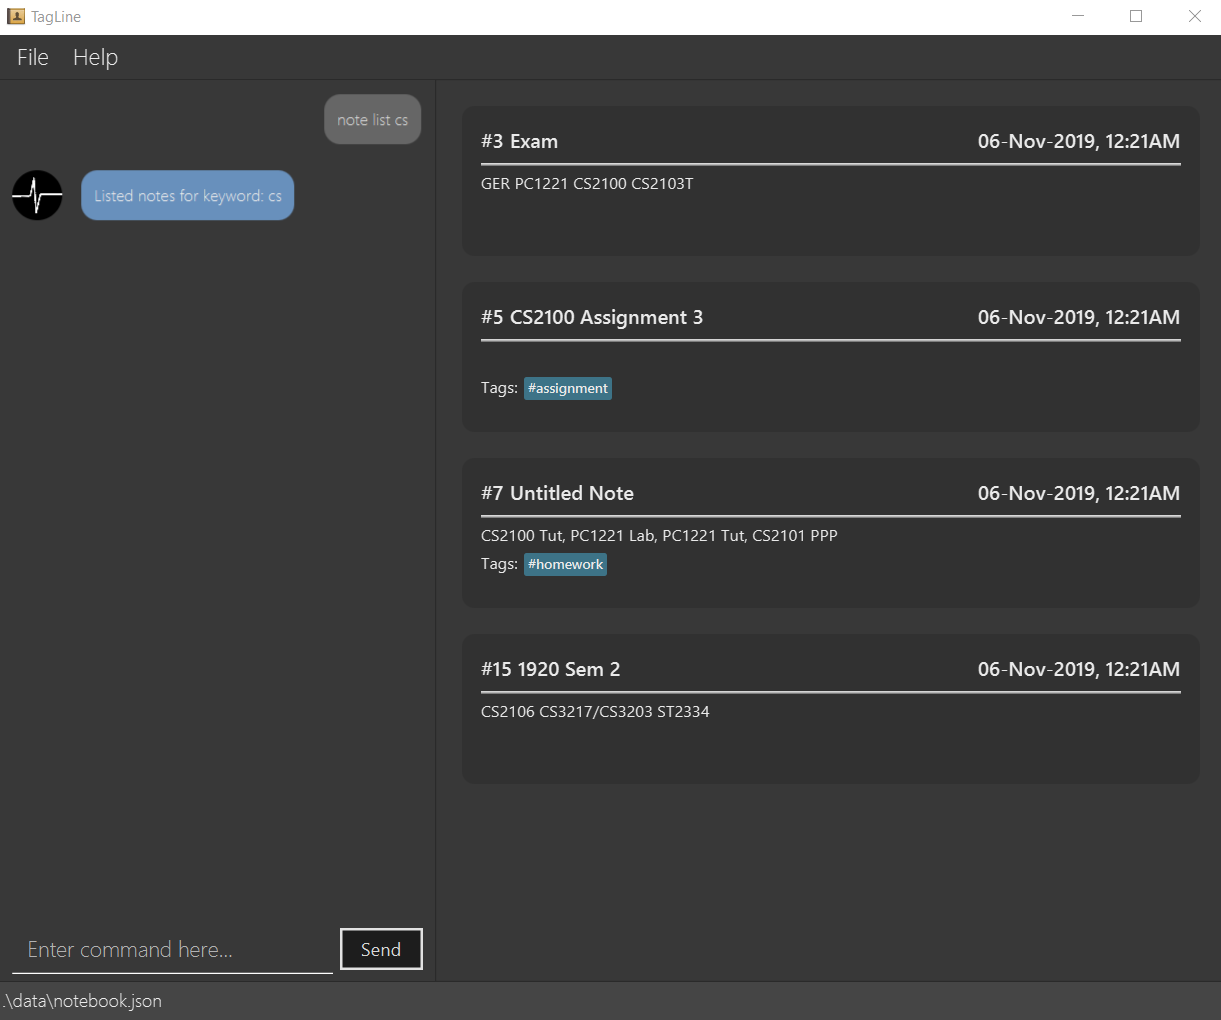
note list cs
Expected: Message on successful listing is displayed. Notes containing keyword are listed in the list pane on the right pane. -
Test case:
note list team bug
Expected: Message on successful listing is displayed. Notes containing any of the keywords are listed in the list pane on the right pane. -
Test case:
note list notfound
Expected: No notes are listed. Message is displayed stating that no notes matching keyword is found.
-
-
Filtering notes by tag
-
Prerequisite: Ensure the sample tags are in the application with
tag list -
Test case:
note list #songs
Expected: Message on successful listing is displayed. Notes tagged by specified tag are listed in the list pane on the right pane. -
Test case:
note list @1
Expected: Similar to previous. -
Test case:
note list %cs2103t
Expected: Similar to previous. -
Test case:
note list @1 %cs2103t
Expected: Similar to previous. Notes tagged by any of the tags specified are listed in the list pane on the right pane. -
Test case:
note list #notfound
Expected: No notes are listed. Message is displayed stating that tag cannot be found. -
Test case:
note list #songs #notfound
Expected: Similar to previous.
-
F.7. Creating a group
-
Creating a group with no members with all groups listed
-
Prerequisites: List all groups using the
group listcommand. Multiple groups in the list. Must have Contact of ID 1 in Addressbook (the display showing all available contacts, usecontact list), cannot have Contact of ID 0 in Addressbook. Be sure to delete group ao3 before the start of every test case withgroup delete ao3. -
Test case:
group create ao3
Expected: Group ao3 is created with no members. Status message indicates "New group successfully added". -
Test case:
group create ao3 --i 1
Expected: Group ao3 is created with with ContactID of 1 listed in the group. Status message indicates "New group successfully added.". -
Test case:
group create ao3 --i 0 --i 1
Expected: Group ao3 is created with with ContactID of 1 listed in the group. Status message indicates "New group successfully added. The following members were not found [00000]". -
Test case:
group create ao3 --i holland
Expected: Group ao3 is not created. Status message indicates "MemberIds should be numeric and only up to 5 characters long". -
Test case:
group create archive of our own
Expected: UI is unchanged. Status message indicates "GroupNames should not contain whitespace, and it should not be blank. Alphanumeric, dash, and underscores are acceptable".
-
F.8. Adding members to a group
-
Adding members to a group with the group currently being displayed
-
Prerequisites: Display contacts in group BTS with
group find BTS, if not found create with the group. Must have Contact of ID 1 in Addressbook (the display showing all available contacts, usecontact list), cannot have Contact of ID 0 in Addressbook. Group BTS should not contain members with Contact of ID 1 or 0. -
Test case:
group add BTS --i 1
Expected: Group BTS is displayed with members including Contact with ContactID of 1. Status message indicates "Attempting to add contact(s) to group". -
Test case:
group add BTS --i 1
Note: The purpose of this test is cummulative with the previous to add a contact to a group that already exists in the group
Expected: Group BTS is displayed with members including Contact with ContactID of 1. Status message indicates "Attempting to add contact(s) to group". -
Test case:
group add BTS --i 0
Expected: Group BTS is unchanged. Status message indicates "Attempting to add contact(s) to group. The following members were not found [00000]". -
Test case:
group add BTS --i holland
Expected: Group BTS is unchanged. Status message indicates "MemberIds should be numeric and only up to 5 characters long". -
Test case:
group add archive of our own --i 1
Expected: UI is unchanged. Status message indicates "GroupNames should not contain whitespace, and it should not be blank. Alphanumeric, dash, and underscores are acceptable".
-
F.9. Removing members from a group
-
Removing members from a group with the group currently being displayed
-
Prerequisites: Display contacts in group BTS with
group find BTS, if not found create with the group. Must have Contact of ID 1 in the group (if not there add it in usinggroup add BTS --i 1), cannot have Contact of ID 0 in the group. -
Test case:
group remove BTS --i 1
*Expected: Group BTS is displayed with members excluding Contact with ContactID of 1. Status message indicates "Attempting to remove contact(s) from group.". -
Test case:
group remove BTS --i 0
*Expected: Group BTS is unchanged. Status message indicates "Attempting to remove contact(s) from group. The following members were not found [00000]". -
Test case:
group remove BTS --i holland
Expected: Group BTS is unchanged. Status message indicates "MemberIds should be numeric and only up to 5 characters long". -
Test case:
group remove bangtan sonyeondan --i 1
Expected: UI is unchanged. Status message indicates "GroupNames should not contain whitespace, and it should not be blank. Alphanumeric, dash, and underscores are acceptable".
-
F.10. List all available groups
-
List all groups.
-
Prerequisites: Must contain at least one Group
-
Test case:
group list
Expected: All groups are listed. Status message indicates "Success! Listing groups found."
-
F.11. Find a specific group
-
Display all members in a group with group currently not being dislayed.
-
Prerequisites: Group BTS must exist in the list of group, check with
group list, if not found create with the group. Group fanficdotnet does not exist in list of groups. Ensure that group is currently not being displayed usingcontact listbefore every test case. -
Test case:
group find BTS
*Expected: Group BTS is displayed with members. Status message indicates "Success! Di*splaying the group". -
Test case:
group find fanficdotnet
Expected: UI is unchanged. Status message indicates "The group name provided could not be found.". -
Test case:
group find archive of our own
Expected: UI is unchanged. Status message indicates "GroupNames should not contain whitespace, and it should not be blank. Alphanumeric, dash, and underscores are acceptable".
-
F.12. Deleting a group
-
Deleting a group while viewing members in the group
-
Prerequisites: View group ao3 (which must already exist otherwise create it) with
group find ao3, group ao3 must have Contact of ContactID 1 in it and exist in Addressbook (check withcontact list). -
Test case:
group delete ao3
Expected: Group ao3 is deleted and all groups remaining groups (if any) are being displayed, contact of contactID 1 still exists in Addressbook. Status message indicates "Success! now showing all groups.". -
Test case:
group delete archive of our own
Expected: UI is unchanged. Status message indicates "GroupNames should not contain whitespace, and it should not be blank. Alphanumeric, dash, and underscores are acceptable".
-
F.13. Tagging a note
-
Prerequisites: Enter
note listcommand to view all notes. Ensure that note with id1exists. Otherwise, take any other note or create one and replace all id1with the chosen note’s id in each of the following test cases. -
Tagging a note with hash tag.
-
Prerequisites: Note with id
1is not tagged with#any topic,#topic1,#topic2, and#topic3. -
Test case:
note tag 1 --t #any topic
Expected: Note successfully tagged with#any topicwhich should be reflected in the response message and in the note view. -
Test case: Enter
note tag 1 --t #any topictwice
Expected: The first time we enter the command, it should succeed normally as described in the previous test case whereas the second time we enter the same command, we would get an error message saying that the tag has been tagged to the note. -
Test case:
note tag 1 --t #topic1 --t #topic2 --t #topic3
Expected: Note successfully tagged with the three hash tag which should be reflected in the response message and in the note view. -
Test case: Enter
note tag 1 --t #topic1 --t #topic2then enternote tag 1 --t #topic1 --t #topic3
Expected: The first time we enter the command, it should succeed normally as described in the previous test case whereas the second time we enter the next command, we would get an error message saying that there are tags which have been tagged to the note. In this case, it is#topic1 -
Test case: Enter
note tag 1 --t #0123456789012345678901234567890
Expected: We will get an error message saying that the maximum character for hash tag is 30.
-
-
Tagging a note with contact tag
-
Tagging a note with group tag
-
Tagging a note with all types of tag
-
Prerequisites: There is a contact with id
1, otherwise you may choose any other existing contact id. There is a group with nameBTS, otherwise you may create one. Note with id1is not tagged with#topic,@00001and%BTS. -
Test case:
note tag 1 --t #topic --t @00001 --t %BTS
Expected: Note successfully tagged with the three hash tag which should be reflected in the response message and in the note view.
-
F.14. Untagging a note
-
Prerequisites: Enter
note listcommand to view all notes. Ensure that note with id1exists. Otherwise, take any other note or create one and replace all id1with the chosen note’s id in each of the following test cases. -
Untagging a note with hash tag.
-
Prerequisites: Note with id
1is tagged with#any topic,#topic1,#topic2, and#topic3. -
Test case:
note untag 1 --t #any topic
Expected: Note successfully untagged with#any topicwhich should be reflected in the response message and in the note view. -
Test case: Enter
note untag 1 --t #any topictwice
Expected: The first time we enter the command, it should succeed normally as described in the previous test case whereas the second time we enter the same command, we would get an error message saying that the tag is not tagged to the note. -
Test case:
note untag 1 --t #topic1 --t #topic2 --t #topic3
Expected: Note successfully untagged with the three hash tag which should be reflected in the response message and in the note view. -
Test case: Enter
note untag 1 --t #topic1 --t #topic2then enternote tag 1 --t #topic1 --t #topic3
Expected: The first time we enter the command, it should succeed normally as described in the previous test case whereas the second time we enter the next command, we would get an error message saying that there are tags which are not tagged to the note. In this case, it is#topic1 -
Test case: Enter
note untag 1 --t #0123456789012345678901234567890
Expected: We will get an error message saying that the maximum character for hash tag is 30.
-
-
Untagging a note with contact tag
-
Untagging a note with group tag
-
Untagging a note with all types of tag
-
Prerequisites: There is a contact with id
1, otherwise you may choose any other existing contact id. There is a group with nameBTS, otherwise you may create one. Note with id1is tagged with#topic,@00001and%BTS. -
Test case:
note untag 1 --t #topic --t @00001 --t %BTS
Expected: Note successfully untagged with the three hash tag which should be reflected in the response message and in the note view.
-